Hids
IDS(入侵检测系统)分为 HIDS(基于主机的入侵检测系统)和 NIDS(基于网络的入侵检测系统)。本文讲述 HIDS 的基本原理、应用及实现
基本原理
应用
实现
OSSEC
简介:
OSSEC (Open Source HIDS SECurity) is a free, open-source host-based intrusion detection system (HIDS). It performs log analysis, integrity checking, Windows registry monitoring, rootkit detection, time-based alerting, and active response. It provides intrusion detection for most operating systems, including Linux, OpenBSD, FreeBSD, OS X, Solaris and Windows. OSSEC has a centralized, cross-platform architecture allowing multiple systems to be easily monitored and managed.[1] OSSEC has a log analysis engine that is able to correlate and analyze logs from multiple devices and formats.[2]
OSSEC is compliant with Payment Card Industry Data Security Standard (PCI DSS) requirements.
——引用自OSSEC - Wikipedia
相关链接:
实验
为了深入研究 HIDS 的基本原理,我们将以世界上使用最广泛的 OSSEC 为例 1,搭建一个学习环境
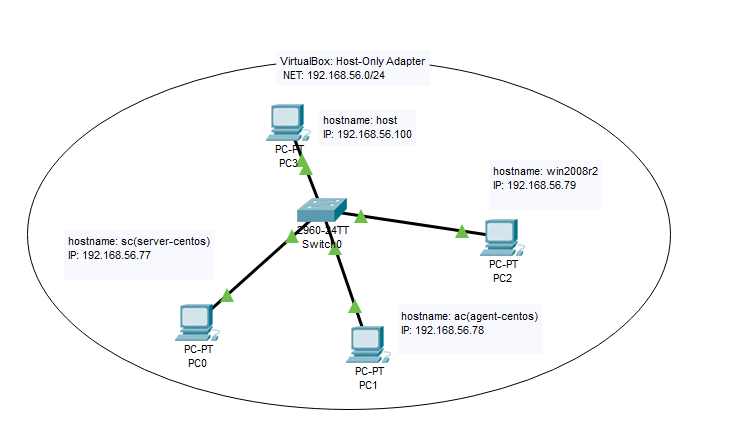
我们使用虚拟机 VirtualBox 来达到这个目的。我们将使用 VirtualBox 安装CentOS 7.7_1908,然后在上面安装 OSSEC,除了用两个 CentOS(其中一个用作 Server,另一个用作 Agent),还将安装一个 Windows Server 2008 R2 用作 Agent
网络拓扑图
下载安装 CentOS
- 下载
CentOS镜像:https://linux.xidian.edu.cn/mirrors/centos/7.7.1908/isos/x86_64/ - 安装
CentOS,用作Agent - 生成快照
init,以备后用
公共准备工作
这一部分进行了 sc 和 ac 都需要的操作
- 添加
host_only网卡 - 安装
git vim,应用个人配置,准备 SSH,配置host_only网卡的静态 IP 及网关1 2 3 4 5 6 7 8 9 10 11
cd yum install git vim bash-completion -y git clone https://github.com/wsxq2/MyProfile cd MyProfile ./start.sh c put cd [[ -d .ssh ]] || (mkdir .ssh && chmod 700 .ssh) touch ~/.ssh/authorized_keys #vim ~/.ssh/authorized_keys #配置 SSH 公钥认证登录 #sed 'balabala' /etc/sysconfig/network-scripts/ifcfg-enp0s8 #配置 host_only 网卡 #systemctl restart network # 重启网络
其中
MyProfile是我设计的一个用于在任何地方都能使用的我习惯的配置文件,如.vimrc、.bashrc等等。大家可以跳过 😂 - 安装常用工具:
1
yum install wget gcc unzip tree zlib-devel ntpdate -y
- 自动同步时间:
1
echo '*/1 * * * * /bin/bash -c "/usr/sbin/ntpdate pool.ntp.org" >/dev/null 2>&1' >> /etc/crontab
- 生成快照
before_all
在 sc 上安装 OSSEC
- 克隆以得到
Server端 - 修改克隆后的
host_only网卡的静态 IP1
vim /etc/sysconfig/network-scripts/ifcfg-enp0s8 #修改 IP 地址
- 安装:
1
2
3
4
5
6
wget https://github.com/ossec/ossec-hids/archive/3.3.0.zip
unzip -q 3.3.0.zip
wget https://ftp.pcre.org/pub/pcre/pcre2-10.32.tar.gz
tar xf pcre2-10.32.tar.gz -C ossec-hids-*/src/external/
#cp preloaded-vars.conf.example preloaded-vars.conf 并修改 USER_INSTALL_TYPE 为 server 及修改 Server 相关配置
cd ossec-hids-3.3.0 && ./install.sh
在 ac 上安装 OSSEC
1
2
3
4
5
6
wget https://github.com/ossec/ossec-hids/archive/3.3.0.zip
unzip -q 3.3.0.zip
wget https://ftp.pcre.org/pub/pcre/pcre2-10.32.tar.gz
tar xf pcre2-10.32.tar.gz -C ossec-hids-*/src/external/
#cp preloaded-vars.conf.example preloaded-vars.conf 并修改 USER_INSTALL_TYPE 为 agent 及修改 Agent 相关配置
cd ossec-hids-3.3.0 && ./install.sh
配置 sc 和 ac
- 在
sc上添加 Agentac:1 2
/var/ossec/bin/manage_agents -a 192.168.56.78 -n ac /var/ossec/bin/manage_agents -l
- 在
sc上获取 Agentac的 Key:1
/var/ossec/bin/manage_agents -e 001
- 在 ac 上导入获取到 Key:
1
/var/ossec/bin/manage_agents -i 001
- 在 sc 和 ac 上运行 OSSEC:
1
2
/var/ossec/bin/ossec-control start
/var/ossec/bin/ossec-control status
在 win2008r2 上安装并配置 OSSEC
根据官方文档,Windows 只能用作 Agent,且配置过程极为简单:
- 下载安装程序:OSSEC Downloads - OSSEC
- 安装
- 配置 Server IP 和 Key:
1
2
192.168.56.77 # IP
MDAyIHdpbjIwMDhyMiAxOTIuMTY4LjU2Ljc5IDg2MTdiMzA3NjI5NTUzM2U4Y2Q4NjdjMTQ4MGRiYmM3OTk1MDEzMDAzZTMxYzMzZmM3Mzg5ZTdhNmI0ZWZhYzg= # Key
其中 Key 来源于在 Server 添加 Agent 并 Extract:
1
2
/var/ossec/bin/manage_agents -a 192.168.56.79 -n win2008r2
/var/ossec/bin/manage_agents -e 002
遇到的问题
- Build fails because of missing pcre2-10.32?
1
2
wget https://ftp.pcre.org/pub/pcre/pcre2-10.32.tar.gz
tar xf pcre2-10.32.tar.gz -C ossec-hids-*/src/external/
详情参见 Build fails because of missing pcre2-10.32 · Issue #1663 · ossec/ossec-hids
os_zlib/os_zlib.c:13:18: fatal error: zlib.h: No such file or directory?1
yum install zlib-devel
- 如何卸载?
1
/var/ossec/bin/ossec-control stop && rm -rf /var/ossec && rm -f /etc/init.d/*ossec* && rm -f /etc/ossec-init.conf
链接
下面总结了本文中使用的所有链接:
https://www.ossec.net/ ↩︎