C语言笔记
本文是笔者使用 C 语言编写程序的笔记。由于 C 和 Linux 关系更加密切,因此我主要使用 Linux 编写 C 程序。本文使用的 Linux 发行版为 CentOS 7.2
相关资料:
- 初学者书籍:《C Primer Plus》,Stephen Prata 著,姜佑 译,人民邮电出版社。笔者使用的是第 6 版(原著 2013-11-25 出版,翻译版本 2016-04-01 出版)
- 参考手册:C 参考手册 - cppreference.com。该参考手册相当权威,建议遇到问题时先尝试从中找到答案
- 编译原理相关:《现代编译原理:C语言描述(修订版)》,Andrew W. Appel、Maia Ginsburg 著,赵克佳、黄春、沈志宇 译,人民邮电出版社。
- 网络编程:《UNIX网络编程》,W. Richard Stevens、Bill Fenner、Andrew M. Rudoff (third ed) 著,清华大学出版社。
- UNIX编程:《UNIX环境高级编程》,W. Richard Stevens 著,尤晋元、张亚英、戚正伟 译,人民邮电出版社。
Linux 中的 C 语言文档支持
由于 Linux 是由 C 语言写的,所以其对 C 语言的支持非常友好。比如其man手册中包含了大量系统调用函数和标准函数。下面对这部分内容作详细说明
Linux 中查看 C 语言中某个函数的文档:
1
man 2|3 FUNCTION
例如:
1
2
3
4
5
6
7
8
man 3 printf
man 3 malloc
man 2 open
man 3 fopen
man 2 read
man 3 fread
man 2 fork
...
如果需要查看某个命令有多少个页面,可以使用参数-aw,例如:
1
2
3
4
5
6
root@master:_posts# man -aw printf
/usr/share/man/man1/printf.1.gz
/usr/share/man/man1p/printf.1p.gz
/usr/share/man/man3/printf.3.gz
/usr/share/man/man3p/printf.3p.gz
root@master:_posts#
其中页面编号的含义:
- 1 Executable programs or shell commands
- 2 System calls (functions provided by the kernel)
- 3 Library calls (functions within program libraries)
- 4 Special files (usually found in /dev)
- 5 File formats and conventions eg /etc/passwd
- 6 Games
- 7 Miscellaneous (including macro packages and conventions), e.g. man(7), groff(7)
- 8 System administration commands (usually only for root)
- 9 Kernel routines [Non standard]
——引用自
man man
关于 Linux 中获取man这个命令的方法请参见 Bash使用笔记
C 标准
| 标准名 | 全名 | 别名 | 采纳时间 | __STDC_VERSION__ | std= | 更新内容 |
|---|---|---|---|---|---|---|
| C89 | ANSI X3.159-1989 | ANSI C, ISO C, Standard C | 1989 | 初始版本 | ||
| C90 | ISO/IEC 9899:1990 | ANSI C, ISO C, Standard C | 1990 | c89, c90, iso9899:1990 | 只改变了格式 | |
| C95 | ISO/IEC 9899:1990/AMD1:1995 | 1995 | 199409 | iso9899:199409 | 发布了一个拓展,该拓展纠正了一些错误,改变了一些语言能力 | |
| C99 | ISO/IEC 9899:1999 | 2000-03 | 199901 | c99, iso9899:1999 | 添加了相当多的内容 | |
| C11 | ISO/IEC 9899:2011 | 2011 | 201112 | c11, iso9899:2011 | 添加了 Unicode、_Generic、threads.h、stdatomic.h | |
| C18 | ISO/IEC 9899:2018 | C17 | 2018 | 201710 | c18, iso9899:2018 | 解决了 C11 中的缺陷,澄清了很多问题 |
(以上数据来自 ANSI C - Wikipedia和笔者的亲自测试)
其中,需要注意的是:在C95之前没有定义__STDC_VERSION__这个宏,所以为空;全名、__STDC_VERSION__、采纳时间并不完全对应;C89 和 C90 通常放在一块说,而实质指的是 C90;C95 标准并不出名,也不常用。
此外,值得一提的是,GCC 默认使用的标准根据其版本而变化:
OPTIONS
…
Options Controlling C Dialect
…
-std=
Determine the language standard. This option is currently only supported when compiling C or C++.
…
gnu90
gnu89
GNU dialect of ISO C90 (including some C99 features). This is the default for C code.
gnu99
gnu9x
GNU dialect of ISO C99. When ISO C99 is fully implemented in GCC, this will become the default. The name gnu9x is deprecated.
…
——引用自
man gcc(GCC 版本为 4.8.5,2015-06-23,还不完全支持 C99)
如今(2019-09-13),主流编译器都已经近乎完全支持 C99 了,包括 GCC、clang、Microsoft Visual C++等。即便是在更极较慢的 CentOS 中,都已经支持了大量 C99 特性。然而对于 C11 特性,想必还有待普及,更别说 C18 了。这个延迟是真的高啊 😂
此外,大学教的 C 语言通常是 ANSI C,即 C90 标准
概念区分
目标文件 vs 二进制文件
目标文件
UNIX 环境下主要有三种类型的目标文件:
可重定位文件(
*.o)其中包含有适合于其它目标文件链接来创建一个可执行的或者共享的目标文件的代码和数据。
共享的目标文件(
*.so)这种文件存放了适合于在两种上下文里链接的代码和数据:
- 链接程序可把它与其它可重定位文件及共享的目标文件一起处理来创建另一个目标文件;
- 动态链接程序将它与另一个可执行文件及其它的共享目标文件结合到一起,创建一个进程映象。
可执行文件(
ls、flex、a.out等)它包含了一个可以被操作系统创建一个进程来执行之的文件。
汇编程序生成的实际上是第一种类型的目标文件(*.o)。对于后两种还需要其他的一些处理方能得到,这个就是链接程序的工作了。
目标文件由段组成。通常一个目标文件中至少有两个段:
- 代码段:该段中所包含的主要是程序的指令。该段一般是可读和可执行的,但一般却不可写。
- 数据段:主要存放程序中要用到的各种全局变量或静态的数据。一般数据段都是可读,可写,可执行的。
(以上内容来自 C/C++程序编译过程详解 - mickole - 博客园)
二进制文件
事实上,非文本文件均可称为二进制文件。包括视频文件、音频文件、图片文件、obj 文件(*.o)等等
但是在很多时候,二进制通常指代的是目标文件(即*.o、*.so、a.out等)。例如安全领域中的二进制文件分析便是如此。后文中也常常使用二进制文件指代目标文件
libc vs glibc
libc
The term “libc” is commonly used as a shorthand for the “standard C library”, a library of standard functions that can be used by all C programs (and sometimes by programs in other languages). Because of some history (see below), use of the term “libc” to refer to the standard C library is somewhat ambiguous on Linux.
——引用自
man libc
glibc
By far the most widely used C library on Linux is the GNU C Library ⟨http://www.gnu.org/software/libc/⟩, often referred to as glibc. This is the C library that is nowadays used in all major Linux distributions. It is also the C library whose details are documented in the relevant pages of the man-pages project (primarily in Section 3 of the manual). Documentation of glibc is also available in the glibc manual, available via the command info libc. Release 1.0 of glibc was made in September 1992. (There were earlier 0.x releases.) The next major release of glibc was 2.0, at the beginning of 1997.
The pathname /lib/libc.so.6 (or something similar) is normally a symbolic link that points to the location of the glibc library, and executing this pathname will cause glibc to display various information about the version installed on your system.
——引用自
man libc
即 glibc 是当前(2019-09-01) Linux 中最为广泛使用的标准 C 库,当前 Linux 中的 libc 实质上就是 glibc:
1
2
3
4
5
6
7
8
9
10
11
12
13
14
15
16
17
18
root@master:~# /lib64/libc.so.6
GNU C Library (GNU libc) stable release version 2.17, by Roland McGrath et al.
Copyright (C) 2012 Free Software Foundation, Inc.
This is free software; see the source for copying conditions.
There is NO warranty; not even for MERCHANTABILITY or FITNESS FOR A
PARTICULAR PURPOSE.
Compiled by GNU CC version 4.8.5 20150623 (Red Hat 4.8.5-28).
Compiled on a Linux 3.10.0 system on 2018-04-10.
Available extensions:
        The C stubs add-on version 2.1.2.
        crypt add-on version 2.1 by Michael Glad and others
        GNU Libidn by Simon Josefsson
        Native POSIX Threads Library by Ulrich Drepper et al
        BIND-8.2.3-T5B
        RT using linux kernel aio
libc ABIs: UNIQUE IFUNC
For bug reporting instructions, please see:
<https://www.gnu.org/software/libc/bugs.html>.
进一步查看 Linux 中的libc.so.6:
1
2
3
4
5
6
7
8
9
root@master:~# file /lib64/libc.so.6
/lib64/libc.so.6: symbolic link to `libc-2.17.so'
root@master:~# ll /lib64/libc.so.6
lrwxrwxrwx. 1 root root 12 Jun  5  2018 /lib64/libc.so.6 -> libc-2.17.so
root@master:~# ll /lib64/libc-2.17.so
-rwxr-xr-x. 1 root root 2.1M Apr 10  2018 /lib64/libc-2.17.so
root@master:~# file !!:$
file /lib64/libc-2.17.so
/lib64/libc-2.17.so: ELF 64-bit LSB shared object, x86-64, version 1 (GNU/Linux), dynamically linked (uses shared libs), BuildID[sha1]=cb4b7554d1adbef2f001142dd6f0a5139fc9aa69, for GNU/Linux 2.6.32, not stripped
可知其指向/lib64/libc-2.17.so,且其为 shared object
编译过程
我们常常使用如下命令编译一个源码文件:
1
gcc a.c
例如:
1
2
3
4
5
6
root@master:tmp# ls
a.c
root@master:tmp# gcc a.c
root@master:tmp# ls
a.c  a.out
root@master:tmp#
可以看到使用gcc命令编译后会生成一个文件a.out。然后我们就可以使用./a.out命令运行它了:
1
2
3
root@master:tmp# ./a.out
Hello the world!
root@master:tmp#
那么问题来了,gcc a.c到底做了些什么,让原本的一个人类可读的文本文件变成了一个计算机可读的二进制文件?我们可以使用 gcc 的-v参数以查看详情:
1
2
3
4
5
6
7
8
root@master:tmp# gcc -v a.c
...
 /usr/libexec/gcc/x86_64-redhat-linux/4.8.5/cc1 -quiet -v a.c -quiet -dumpbase a.c -mtune=generic -march=x86-64 -auxbase a -version -o /tmp/ccGKidBd.s
...
 as -v --64 -o /tmp/ccQqEfl4.o /tmp/ccGKidBd.s
...
 /usr/libexec/gcc/x86_64-redhat-linux/4.8.5/collect2 --build-id --no-add-needed --eh-frame-hdr --hash-style=gnu -m elf_x86_64 -dynamic-linker /lib64/ld-linux-x86-64.so.2 /usr/lib/gcc/x86_64-redhat-linux/4.8.5/../../../../lib64/crt1.o /usr/lib/gcc/x86_64-redhat-linux/4.8.5/../../../../lib64/crti.o /usr/lib/gcc/x86_64-redhat-linux/4.8.5/crtbegin.o -L/usr/lib/gcc/x86_64-redhat-linux/4.8.5 -L/usr/lib/gcc/x86_64-redhat-linux/4.8.5/../../../../lib64 -L/lib/../lib64 -L/usr/lib/../lib64 -L/usr/lib/gcc/x86_64-redhat-linux/4.8.5/../../.. /tmp/ccQqEfl4.o -lgcc --as-needed -lgcc_s --no-as-needed -lc -lgcc --as-needed -lgcc_s --no-as-needed /usr/lib/gcc/x86_64-redhat-linux/4.8.5/crtend.o /usr/lib/gcc/x86_64-redhat-linux/4.8.5/../../../../lib64/crtn.o
root@master:tmp#
可以看到gcc依次执行了如下命令:
/usr/libexec/gcc/x86_64-redhat-linux/4.8.5/cc1。该命令的作用是进行预处理和编译(转换为汇编代码)。参见 Relationship between cc1 and gcc? - Unix & Linux Stack Exchangeas。该命令的作用是进行汇编/usr/libexec/gcc/x86_64-redhat-linux/4.8.5/collect2。该命令是ld命令的超集,作用和ld命令类似,是进行链接以生成可执行文件。有其帮助为证:1 2 3 4 5 6 7 8 9 10 11 12 13 14 15
root@master:tmp# /usr/libexec/gcc/x86_64-redhat-linux/4.8.5/collect2 --help Usage: collect2 [options] Wrap linker and generate constructor code if needed. Options: -debug Enable debug output --help Display this information -v, --version Display this program's version number Overview: http://gcc.gnu.org/onlinedocs/gccint/Collect2.html Report bugs: <http://bugzilla.redhat.com/bugzilla> Usage: /usr/bin/ld [options] file... Options: -a KEYWORD Shared library control for HP/UX compatibility ...
在这一步中,
collect2被传递了大量的参数
由此可见,C 程序完整的编译过程(gcc a.c)如下:
- 预处理
- 编译
- 汇编
- 链接
如下图所示:
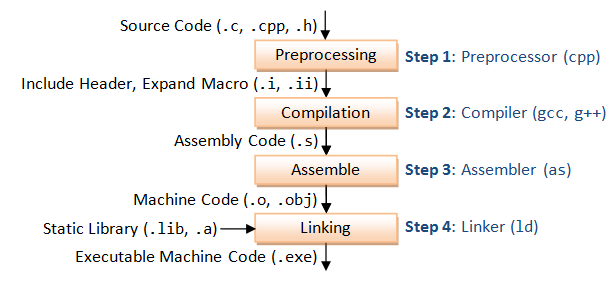
(上图引用自https://www.cnblogs.com/CarpenterLee/p/5994681.html)
下面简单讲一下上述的每个步骤具体都干了些啥。以经典的 Hello World 程序为例:
1
2
3
4
5
6
#include <stdio.h>
int main(int argc, char *argv[])
{
  printf("Hello the world!\n");
  return 0;
}
分析编译过程会用到一些分析工具,详见相关章节
预处理过程
gcc -E(预处理)输出内容解读:Preprocessor Output - The C Preprocessor
读取 C 源程序,对其中的伪指令(以#开头的指令)、特殊符号、注释进行处理。
伪指令主要包括以下三个方面:
- 宏定义指令。例如
#define Name TokenString,#undef等。对于前一个伪指令,预处理所要做的是将程序中的所有Name用TokenString替换,但作为字符串常量的Name则不被替换。对于后者,则将取消对某个宏的定义,使以后该串的出现不再被替换。 - 条件编译指令。如
#ifdef,#ifndef,#else,#elif,#endif等。 这些伪指令的引入使得程序员可以通过定义不同的宏来决定编译程序对哪些代码进行处理。预处理程序将根据有关的文件,将那些不必要的代码过滤掉。 头文件包含指令。如
#include "FileName"、#include <FileName>等。在头文件中一般用伪指令
#define定义了大量的宏(最常见的是字符常量),同时包含有各种外部符号的声明。采用头文件的目的主要是为了使某些定义可以供多个不同的 C 源程序使用。因为在需要用到这些定义的 C 源程序中,只需加上一条
#include语句即可,而不必再在此文件中将这些定义重复一遍。预处理程序将把头文件中的定义统统都加入到它所产生的输出文件中,以供编译程序对之进行处理。包含到 C 源程序中的头文件可以是系统提供的,这些头文件一般被放在
/usr/include目录下。在程序中#include它们要使用尖括号(例如<stdio.h>)。另外开发人员也可以定义自己的头文件,这些文件一般与 C 源程序放在同一目录下,此时在#include中要用双引号(例如"myheader.h")。
处理特殊符号主要是指替换像__LINE__这样的变量。除了__LINE__(当前行号)还包括__FILE__(当前文件名)、__DATE__(预处理日期)、__TIME__(预处理时间)等
处理注释主要是指删除注释,因为后续的编译步骤用不到
由此可见,预处理程序所完成的基本上是对源程序的“替代”工作。经过此种替代,生成一个没有宏定义、没有条件编译指令、没有特殊符号的输出文件。这个文件的含义同没有经过预处理的源文件是相同的,但内容有所不同。下一步,此输出文件将作为编译程序的输入而被翻译成为机器指令。
(以上内容修改自 C/C++程序编译过程详解 - mickole - 博客园)
简单地说,预处理负责处理头文件、宏、注释、条件编译指令、特殊符号,即将头文件包含进来、替换宏、去掉注释、根据条件编译指令过滤掉不必要的代码(减少后续的编译量)、替换特殊符号(如__LINE__)
预处理对应于cpp命令。如:
1
cpp -o a.i a.c
或者 gcc 的-E参数:
1
gcc -E -o a.i a.c
当然,clang 也是可以的;
1
clang -E -o a.i a.c
然后,打开a.i:
1
2
3
4
5
6
7
8
9
10
11
12
13
14
15
16
17
18
19
20
21
22
23
24
25
26
27
# 1 "a.c"
# 1 "<built-in>"
# 1 "<command-line>"
# 1 "/usr/include/stdc-predef.h" 1 3 4
# 1 "<command-line>" 2
# 1 "a.c"
# 1 "/usr/include/stdio.h" 1 3 4
...
typedef unsigned char __u_char;
typedef unsigned short int __u_short;
typedef unsigned int __u_int;
typedef unsigned long int __u_long;
...
extern int fprintf (FILE *__restrict __stream,
      const char *__restrict __format, ...);

extern int printf (const char *__restrict __format, ...);

extern int sprintf (char *__restrict __s,
      const char *__restrict __format, ...) __attribute__ ((__nothrow__));
...
# 2 "a.c" 2
int main(int argc, char *argv[])
{
  printf("Hello the world!\n");
  return 0;
}
编译过程
概览
编译负责将完整的源代码文件变换为目标代码(在这里是汇编代码)。即《编译原理》一课中所学的内容。具体而言,经历了如下步骤:
词法分析器生成记号流。
从词法分析的层面上看,语言是由字母组成的记号的集合。记号用正规式(3型文法)描述
语法分析器生成抽象语法树。
从语法分析的层面上看,语言是由记号组成的句子的集合。句子用 CFG(Context Free Grammer)(2型方法) 描述,也可以用抽象语法树来表示
语义分析器生成中间代码。
中间代码有多种形式,常见的有三种:树、后缀式、三地址码。对于解释器(如 Python)而言,通常使用树和后缀式作为中间代码;对于编译器(如 gcc)而言,通常使用三地址码作为中间代码。
事实上,
cc1用的是 RTL(不是三地址码) 作为中间代码,据说它是从 LISP 语言得到的灵感- 代码优化器生成精简后的中间代码
目标代码生成器生成目标代码。
目标代码的形式可以分为两大类:汇编语言和机器指令。机器指令又可以根据需求的不同分为绝对机器代码和可再定位机器代码。绝对机器的代码的优点是可以立即执行,一般应用于一类称为 load-and-go 形式的编译模式,即编译完成后立即执行,不形成磁盘形式的目标文件,这种形式特别适合于初学者。可再定位机器代码的优点是目标代码可以被任意链接并装入内存的任意位置,是编译器最多采用的代码形式。
对于
cc1而言目标代码是汇编代码
生成 a.s
GCC 中编译对应于cc1命令。如:
1
/usr/libexec/gcc/x86_64-redhat-linux/4.8.5/cc1 a.c -o a.s
或者 gcc 的-S参数:
1
gcc -S -o a.s a.c
打开a.s:
1
2
3
4
5
6
7
8
9
10
11
12
13
14
15
16
17
18
19
20
21
22
23
24
25
26
27
28
29
	.file	"a.c"
	.section	.rodata
.LC0:
	.string	"Hello the world!"
	.text
	.globl	main
	.type	main, @function
main:
.LFB0:
	.cfi_startproc
	pushq	%rbp
	.cfi_def_cfa_offset 16
	.cfi_offset 6, -16
	movq	%rsp, %rbp
	.cfi_def_cfa_register 6
	subq	$16, %rsp
	movl	%edi, -4(%rbp)
	movq	%rsi, -16(%rbp)
	movl	$.LC0, %edi
	call	puts
	movl	$0, %eax
	leave
	.cfi_def_cfa 7, 8
	ret
	.cfi_endproc
.LFE0:
	.size	main, .-main
	.ident	"GCC: (GNU) 4.8.5 20150623 (Red Hat 4.8.5-28)"
	.section	.note.GNU-stack,"",@progbits
由于笔者学习汇编时使用的是 intel 风格(Windows 常用)的语法,而上述汇编代码则使用的是 AT&T 风格(Linux 常用)的语法。关于这两种风格的区别见后文相关章节
分析 a.s
现在再来看汇编代码就会发现变得亲切了:
1
2
3
4
5
6
7
8
9
10
11
12
13
14
15
16
17
18
19
20
21
22
23
24
25
26
27
28
29
	.file	"a.c"
	.section	.rodata
.LC0:
	.string	"Hello the world!"
	.text
	.globl	main
	.type	main, @function
main:
.LFB0:
	.cfi_startproc
	pushq	%rbp
	.cfi_def_cfa_offset 16
	.cfi_offset 6, -16
	movq	%rsp, %rbp
	.cfi_def_cfa_register 6
	subq	$16, %rsp
	movl	%edi, -4(%rbp)
	movq	%rsi, -16(%rbp)
	movl	$.LC0, %edi
	call	puts
	movl	$0, %eax
	leave
	.cfi_def_cfa 7, 8
	ret
	.cfi_endproc
.LFE0:
	.size	main, .-main
	.ident	"GCC: (GNU) 4.8.5 20150623 (Red Hat 4.8.5-28)"
	.section	.note.GNU-stack,"",@progbits
其中值得注意的是如下三行:
1
2
3
	movl	$.LC0, %edi
	call	puts
	movl	$0, %eax
首先将字符串Hello the world!传送到edi寄存器,然后调用puts函数打印到屏幕上。问题来了,这里为什么是puts而不源代码中的printf呢?事实上,gcc 会把只有一个参数的printf 替换成puts以提高效率,可以加-fno-builtin参数关闭这项优化。最后将0传送到eax寄存器,准备返回
事实上,gcc -S就是调用了cc1程序进行编译(可以通过-v参数验证)。
直接调用cc1程序,在生成a.s之余,还会打印出cc1编译各个阶段所消耗的时间。我们可以看到预处理、词法分析、语法分析等阶段(由于用于演示的 Hello World 程序过于简单,所以只体现了词法分析):
1
2
3
4
5
6
7
8
9
10
11
12
13
root@master:tmp# /usr/libexec/gcc/x86_64-redhat-linux/4.8.5/cc1 a.c -o a.s
 main
Analyzing compilation unit
Performing interprocedural optimizations
 <*free_lang_data> <visibility> <early_local_cleanups> <*free_inline_summary> <whole-program>Assembling functions:
 main
Execution times (seconds)
 phase setup             :   0.00 ( 0%) usr   0.00 ( 0%) sys   0.01 (33%) wall    1094 kB (68%) ggc
 phase parsing           :   0.01 (100%) usr   0.01 (100%) sys   0.01 (33%) wall     461 kB (29%) ggc
 phase finalize          :   0.00 ( 0%) usr   0.00 ( 0%) sys   0.01 (33%) wall       0 kB ( 0%) ggc
 lexical analysis        :   0.01 (100%) usr   0.01 (100%) sys   0.01 (33%) wall       0 kB ( 0%) ggc
 TOTAL                 :   0.01             0.01             0.03               1605 kB
root@master:tmp#
中间代码
此外,还可以使用-fdump-rtl-expand参数生成gcc所使用的中间代码 RTL:
1
/usr/libexec/gcc/x86_64-redhat-linux/4.8.5/cc1 -fdump-rtl-expand -o a.s a.c
此时我们便得到了一个a.c.166r.expand文件,打开它:
1
2
3
4
5
6
7
8
9
10
11
12
13
14
15
16
17
18
19
20
21
22
23
24
25
26
27
28
29
30
31
32
33
34
35
36
37
38
39
40
;; Function main (main, funcdef_no=0, decl_uid=2178, cgraph_uid=0)


;; Generating RTL for gimple basic block 2

;; Generating RTL for gimple basic block 3
deleting block 5


try_optimize_cfg iteration 1

Merging block 3 into block 2...
Merged blocks 2 and 3.
Merged 2 and 3 without moving.
Merging block 4 into block 2...
Merged blocks 2 and 4.
Merged 2 and 4 without moving.
Merging block 5 into block 2...
Merged blocks 2 and 5.
Merged 2 and 5 without moving.


try_optimize_cfg iteration 2


;;
;; Full RTL generated for this function:
;;
(note 1 0 5 NOTE_INSN_DELETED)
(note 5 1 2 2 [bb 2] NOTE_INSN_BASIC_BLOCK)
(insn 2 5 3 2 (set (mem/c:SI (plus:DI (reg/f:DI 54 virtual-stack-vars)
                (const_int -4 [0xfffffffffffffffc])) [0 argc+0 S4 A32])
        (reg:SI 5 di [ argc ])) a.c:3 -1
     (nil))
(insn 3 2 4 2 (set (mem/f/c:DI (plus:DI (reg/f:DI 54 virtual-stack-vars)
                (const_int -16 [0xfffffffffffffff0])) [0 argv+0 S8 A64])
        (reg:DI 4 si [ argv ])) a.c:3 -1
     (nil))
...
内容是一个用列表形式表示的树形结构(类似于语法树?对应于前述的树这一中间代码形式?)
相比之下,clang 的中间表示就漂亮多了(至少从人类可读的角度说)。使用如下命令:
1
clang -S -emit-llvm -o a.ll a.c
可以生成 LLVM(Low Level Virtual Machine)中间代码a.ll(注意这个不是汇编码),能够清晰地看到main()函数的定义、Hello World\n 字符串(.str)、对printf的函数调用和return 0:
1
2
3
4
5
6
7
8
9
10
11
12
13
14
15
16
17
18
19
20
21
22
23
24
25
26
; ModuleID = 'a.c'
target datalayout = "e-p:64:64:64-i1:8:8-i8:8:8-i16:16:16-i32:32:32-i64:64:64-f32:32:32-f64:64:64-v64:64:64-v128:128:128-a0:0:64-s0:64:64-f80:128:128-n8:16:32:64-S128"
target triple = "x86_64-redhat-linux-gnu"

@.str = private unnamed_addr constant [18 x i8] c"Hello the world!\0A\00", align 1

; Function Attrs: nounwind uwtable
define i32 @main(i32 %argc, i8** %argv) #0 {
  %1 = alloca i32, align 4
  %2 = alloca i32, align 4
  %3 = alloca i8**, align 8
  store i32 0, i32* %1
  store i32 %argc, i32* %2, align 4
  store i8** %argv, i8*** %3, align 8
  %4 = call i32 (i8*, ...)* @printf(i8* getelementptr inbounds ([18 x i8]* @.str, i32 0, i32 0))
  ret i32 0
}

declare i32 @printf(i8*, ...) #1

attributes #0 = { nounwind uwtable "less-precise-fpmad"="false" "no-frame-pointer-elim"="true" "no-frame-pointer-elim-non-leaf" "no-infs-fp-math"="false" "no-nans-fp-math"="false" "stack-protector-buffer-size"="8" "unsafe-fp-math"="false" "use-soft-float"="false" }
attributes #1 = { "less-precise-fpmad"="false" "no-frame-pointer-elim"="true" "no-frame-pointer-elim-non-leaf" "no-infs-fp-math"="false" "no-nans-fp-math"="false" "stack-protector-buffer-size"="8" "unsafe-fp-math"="false" "use-soft-float"="false" }

!llvm.ident = !{!0}

!0 = metadata !{metadata !"clang version 3.4.2 (tags/RELEASE_34/dot2-final)"}
中间代码优化
为了突出优化的效果,我们换个源代码文件(b.c):
1
2
3
4
5
6
7
8
9
10
#include <stdio.h>
int main() {
  int i, a = 42, sum = 0, unused;
  for (i = 0; i < 256; i++) {
    sum += a;
    unused = a;
  }
  printf("sum = %d\n", sum);
  return 0;
}
不优化的情况下(clang -O0 -S -emit-llvm -o b.ll b.c):
1
2
3
4
5
6
7
8
9
10
11
12
13
14
15
16
17
18
19
20
21
22
23
24
25
26
27
28
29
30
31
32
33
34
35
36
37
38
39
40
41
42
43
44
45
46
47
48
49
50
51
52
53
; ModuleID = 'b.c'
target datalayout = "e-p:64:64:64-i1:8:8-i8:8:8-i16:16:16-i32:32:32-i64:64:64-f32:32:32-f64:64:64-v64:64:64-v128:128:128-a0:0:64-s0:64:64-f80:128:128-n8:16:32:64-S128"
target triple = "x86_64-redhat-linux-gnu"

@.str = private unnamed_addr constant [10 x i8] c"sum = %d\0A\00", align 1

; Function Attrs: nounwind uwtable
define i32 @main() #0 {
  %1 = alloca i32, align 4
  %i = alloca i32, align 4
  %a = alloca i32, align 4
  %sum = alloca i32, align 4
  %unused = alloca i32, align 4
  store i32 0, i32* %1
  store i32 42, i32* %a, align 4
  store i32 0, i32* %sum, align 4
  store i32 0, i32* %i, align 4
  br label %2

; <label>:2                                       ; preds = %10, %0
  %3 = load i32* %i, align 4
  %4 = icmp slt i32 %3, 256
  br i1 %4, label %5, label %13

; <label>:5                                       ; preds = %2
  %6 = load i32* %a, align 4
  %7 = load i32* %sum, align 4
  %8 = add nsw i32 %7, %6
  store i32 %8, i32* %sum, align 4
  %9 = load i32* %a, align 4
  store i32 %9, i32* %unused, align 4
  br label %10

; <label>:10                                      ; preds = %5
  %11 = load i32* %i, align 4
  %12 = add nsw i32 %11, 1
  store i32 %12, i32* %i, align 4
  br label %2

; <label>:13                                      ; preds = %2
  %14 = load i32* %sum, align 4
  %15 = call i32 (i8*, ...)* @printf(i8* getelementptr inbounds ([10 x i8]* @.str, i32 0, i32 0), i32 %14)
  ret i32 0
}

declare i32 @printf(i8*, ...) #1

attributes #0 = { nounwind uwtable "less-precise-fpmad"="false" "no-frame-pointer-elim"="true" "no-frame-pointer-elim-non-leaf" "no-infs-fp-math"="false" "no-nans-fp-math"="false" "stack-protector-buffer-size"="8" "unsafe-fp-math"="false" "use-soft-float"="false" }
attributes #1 = { "less-precise-fpmad"="false" "no-frame-pointer-elim"="true" "no-frame-pointer-elim-non-leaf" "no-infs-fp-math"="false" "no-nans-fp-math"="false" "stack-protector-buffer-size"="8" "unsafe-fp-math"="false" "use-soft-float"="false" }

!llvm.ident = !{!0}

!0 = metadata !{metadata !"clang version 3.4.2 (tags/RELEASE_34/dot2-final)"}
优化后(clang -O1 -S -emit-llvm -o b.ll b.c):
1
2
3
4
5
6
7
8
9
10
11
12
13
14
15
16
17
18
19
20
21
22
; ModuleID = 'b.c'
target datalayout = "e-p:64:64:64-i1:8:8-i8:8:8-i16:16:16-i32:32:32-i64:64:64-f32:32:32-f64:64:64-v64:64:64-v128:128:128-a0:0:64-s0:64:64-f80:128:128-n8:16:32:64-S128"
target triple = "x86_64-redhat-linux-gnu"

@.str = private unnamed_addr constant [10 x i8] c"sum = %d\0A\00", align 1

; Function Attrs: nounwind uwtable
define i32 @main() #0 {
  %1 = tail call i32 (i8*, ...)* @printf(i8* getelementptr inbounds ([10 x i8]* @.str, i64 0, i64 0), i32 10752) #2
  ret i32 0
}

; Function Attrs: nounwind
declare i32 @printf(i8* nocapture readonly, ...) #1

attributes #0 = { nounwind uwtable "less-precise-fpmad"="false" "no-frame-pointer-elim"="false" "no-infs-fp-math"="false" "no-nans-fp-math"="false" "stack-protector-buffer-size"="8" "unsafe-fp-math"="false" "use-soft-float"="false" }
attributes #1 = { nounwind "less-precise-fpmad"="false" "no-frame-pointer-elim"="false" "no-infs-fp-math"="false" "no-nans-fp-math"="false" "stack-protector-buffer-size"="8" "unsafe-fp-math"="false" "use-soft-float"="false" }
attributes #2 = { nounwind }

!llvm.ident = !{!0}

!0 = metadata !{metadata !"clang version 3.4.2 (tags/RELEASE_34/dot2-final)"}
可以看到原本冗长的中间代码只剩了一条printf语句,其两个参数分别是字符串 sum = %d\n 和参数10752(=42*256)。
汇编过程
汇编负责将汇编代码转换为目标代码(*.o)。目标代码是二进制文件(机器码)。
相比编译来说,汇编是个相对轻松愉快的工序,因为它只是根据汇编指令与机器指令的对照表进行一一翻译。
在汇编过程中,只有很少的信息丢失了,因此我们可以有反汇编器(dis-assembler)。反编译器不存在的原因是编译过程中丢失了高级语言的语法结构信息,局部变量的名字也被替换成了偏移量,因此程序一旦被编译为二进制码,就无法被还原成源代码了。
GCC 中汇编对应于as命令。如:
1
as -o a.o a.s
或者 gcc 的-c参数:
1
gcc -c -o a.o a.c
通过汇编我们便可得到 obj 文件(机器码)了。而对于 obj 文件而言,需要了解它们的信息只有使用相应的工具。当然,如果你对 obj 文件的格式了如指掌的话也可以直接使用二进制编辑器进行分析
链接过程
汇编工序已经得到了机器码,为什么还需要链接呢?事实上,未经链接的目标代码(.o 文件)是不可执行的。因为*.o文件只包含了你写的程序的内容,而执行你的 C 程序并非只需要你写的内容,简单地从main函数开始到return 0结束那么简单:
由汇编程序生成的目标文件并不能立即就被执行,其中可能还有许多没有解决的问题。
例如,某个源文件中的函数可能引用了另一个源文件中定义的某个符号(如变量或者函数调用等);在程序中可能调用了某个库文件中的函数,等等。所有的这些问题,都需要经链接程序的处理方能得以解决。
链接程序的主要工作就是将有关的目标文件彼此相连接,也即将在一个文件中引用的符号同该符号在另外一个文件中的定义连接起来,使得所有的这些目标文件成为一个能够被操作系统装入执行的统一整体。
根据开发人员指定的同库函数的链接方式的不同,链接处理可分为两种:
静态链接
在这种链接方式下,函数的代码将从其所在的静态链接库中被拷贝到最终的可执行程序中。这样该程序在被执行时这些代码将被装入到该进程的虚拟地址空间中。静态链接库实际上是一个目标文件的集合,其中的每个文件含有库中的一个或者一组相关函数的代码。
动态链接
在此种方式下,函数的代码被放到称作是动态链接库或共享对象的某个目标文件中。链接程序此时所作的只是在最终的可执行程序中记录下共享对象的名字以及其它少量的登记信息。在此可执行文件被执行时,动态链接库的全部内容将被映射到运行时相应进程的虚地址空间。动态链接程序将根据可执行程序中记录的信息找到相应的函数代码。
对于可执行文件中的函数调用,可分别采用动态链接或静态链接的方法。使用动态链接能够使最终的可执行文件比较短小,并且当共享对象被多个进程使用时能节约一些内存,因为在内存中只需要保存一份此共享对象的代码。但并不是使用动态链接就一定比使用静态链接要优越。在某些情况下动态链接可能带来一些性能上损害。 ——引用自 C/C++程序编译过程详解 - mickole - 博客园
链接负责将多个 obj 文件(*.o)中的符号(symbols,可以理解为函数、变量)收集起来,生成最终的可执行文件。这里的多个 obj 文件不但包括你的项目的所有源代码的 obj 文件,还包括操作系统运行一个 C 程序需要的 obj 文件
链接对应于ld命令。如:
1
ld -o a.out a.o
注意:这里需要传递其它参数,直接这样运行会报错
事实上,ld需要的参数很多,其参数主要都是 obj 文件(*.o),包括crt1.o、crti.o、crtbegin.o、a.o、libgcc.a、libgcc_eh.a、libc.so(动态链接)或libc.a(静态链接)、crtend.o、crtn.o。且它们的顺序是非常重要的(必须按照上面给出的顺序进行链接)
链接需要用到链接库。 链接库有两种,动态链接库和静态链接库。动态链接库放在操作系统的公共位置,运行时加载,被所有程序共享,因此依赖动态链接库的程序可能会因找不到相应的动态链接库而执行失败,但生成的可执行文件较小;静态链接库在编译时被包含进可执行文件中,不依赖系统,可独立运行,但是生成的可执行文件较大
下表展示的是动态和静态库在不同操作系统上的后缀表示:
| 类型\OS | Windows | Linux | MacOS |
|---|---|---|---|
| 静态 | .lib | .a | .a |
| 动态 | .dll | .so | .dylib |
静态库
1
2
$ clang -c x.c y.c
$ ar -rv libhello.a x.o y.o
静态链接:
1
ld -static /lib64/crt1.o /lib64/crti.o /usr/lib/gcc/x86_64-redhat-linux/4.8.5/crtbegin.o a.o -L/usr/lib/gcc/x86_64-redhat-linux/4.8.5/ -L/lib64/ -start -lgcc -lgcc_eh /lib/debug/usr/lib64/libc.a -end  /usr/lib/gcc/x86_64-redhat-linux/4.8.5/crtend.o /lib64/crtn.o
动态库
动态链接:
1
ld /lib64/crt1.o /lib64/crti.o /usr/lib/gcc/x86_64-redhat-linux/4.8.5/crtbegin.o a.o -L/usr/lib/gcc/x86_64-redhat-linux/4.8.5/ -L/lib64/ -start -lgcc -lgcc_eh -lc -end  /usr/lib/gcc/x86_64-redhat-linux/4.8.5/crtend.o /lib64/crtn.o
当然,直接使用gcc就不会这么麻烦了,它会自动添加需要的 obj 文件进行链接:
1
gcc -o a.out a.c
温馨提示:不同 Linux 发行版上述的 obj 文件所在的目录可能不同,如果需要找出它们的目录,可使用find命令:
1
2
3
find /lib/ -name 'crt1.o'
find /lib64/ -name 'crt1.o'
find /usr/ -name 'crt1.o'
此外,在我的 CentOS 7.2 中,很多目录都是另一个目录的软链接:
1
2
3
4
5
6
7
8
9
10
root@master:tmp# ll /{bin,lib,lib64,sbin}
lrwxrwxrwx. 1 root root 7 Jun  5  2018 /bin -> usr/bin
lrwxrwxrwx. 1 root root 7 Jun  5  2018 /lib -> usr/lib
lrwxrwxrwx. 1 root root 9 Jun  5  2018 /lib64 -> usr/lib64
lrwxrwxrwx. 1 root root 8 Jun  5  2018 /sbin -> usr/sbin
root@master:tmp# ll /usr/lib/gcc/x86_64-redhat-linux/
total 4.0K
drwxr-xr-x. 4 root root 4.0K Sep  7  2018 4.8.2
lrwxrwxrwx. 1 root root    5 Sep  7  2018 4.8.5 -> 4.8.2
root@master:tmp#
需要注意的是,在 Linux 中有个环境变量LD_PRELOAD,它的作用是指定在运行时优先加载的动态链接库。也就是说,使用LD_PRELOAD可以在运行时覆盖某些函数的实现。比如,我们可以使用它来替换掉系统调用的实现,或者在运行时注入代码到其他程序中。 这是一个 Linux 系统中非常重要的环境变量。下面是一个详细的介绍:
LD_PRELOAD是Linux系统的一个环境变量,它可以影响程序的运行时的链接(Runtime linker),它允许你定义在程序运行前优先加载的动态链接库。这个功能主要就是用来有选择性的载入不同动态链接库中的相同函数。通过这个环境变量,我们可以在主程序和其动态链接库的中间加载别的动态链接库,甚至覆盖正常的函数库。一方面,我们可以以此功能来使用自己的或是更好的函数(无需别人的源码),而另一方面,我们也可以以向别人的程序注入程序,从而达到特定的目的。
下面将简述各个 obj 文件为何是必要的(具体路径以我使用的 CentOS 为例。再次强调顺序是重要的):
/lib64/crt1.o: 包含入口函数_start,_start又调用了__libc_start_main,__libc_start_main除了接受main函数指针作为参数外还接受另外两个函数指针__libc_csu_init和__libc_csu_fini作为参数,这两个函数指针分别指向_init()函数和_finit()函数,这两个函数分别对应 C 程序入口函数main()前的初始化函数集合和main()后的收尾函数集合我们可以使用
objdump命令反汇编看源码以分析:1 2 3 4 5 6 7 8 9 10 11 12 13 14 15 16 17 18 19 20 21 22 23 24 25
root@master:tmp# objdump -dr /usr/lib64/crt1.o /usr/lib64/crt1.o: file format elf64-x86-64 Disassembly of section .text: 0000000000000000 <_start>: 0: 31 ed xor %ebp,%ebp 2: 49 89 d1 mov %rdx,%r9 5: 5e pop %rsi 6: 48 89 e2 mov %rsp,%rdx 9: 48 83 e4 f0 and $0xfffffffffffffff0,%rsp d: 50 push %rax e: 54 push %rsp f: 49 c7 c0 00 00 00 00 mov $0x0,%r8 12: R_X86_64_32S __libc_csu_fini 16: 48 c7 c1 00 00 00 00 mov $0x0,%rcx 19: R_X86_64_32S __libc_csu_init 1d: 48 c7 c7 00 00 00 00 mov $0x0,%rdi 20: R_X86_64_32S main 24: e8 00 00 00 00 callq 29 <_start+0x29> 25: R_X86_64_PC32 __libc_start_main-0x4 29: f4 hlt root@master:tmp#其中
-d参数表示反汇编,-r参数表示显示需要重定位(填充真实地址)的内容。我们可以看到,代码中的位置 12 (注意这是 16 进制)处有一个需要重定位的函数指针__libc_csu_init,代码位置 19 处有一个需要重定位的函数指针__libc_csu_fini,代码位置 20 处有一个需要重定位的函数指针main,代码位置 25 处有一个需要重定位的__libc_start_main(这里是调用它,以前面的三个函数指针作为参数)由此得以验证前述结论
/lib64/crti.o: 用来辅助完成.init段的收集以实现初始化工作。而crti.o实际上包含的便是_init()函数的开始和结尾部分同样可以使用上述方法验证:
1
2
3
4
5
6
7
8
9
10
11
12
13
14
15
16
17
18
19
20
21
root@master:tmp# objdump -dr /usr/lib64/crti.o

/usr/lib64/crti.o:     file format elf64-x86-64


Disassembly of section .init:

0000000000000000 <_init>:
   0:   48 83 ec 08             sub    $0x8,%rsp
   4:   48 8b 05 00 00 00 00    mov    0x0(%rip),%rax        # b <_init+0xb>
                        7: R_X86_64_GOTPCREL    __gmon_start__-0x4
   b:   48 85 c0                test   %rax,%rax
   e:   74 05                   je     15 <_init+0x15>
  10:   e8 00 00 00 00          callq  15 <_init+0x15>
                        11: R_X86_64_PLT32      __gmon_start__-0x4

Disassembly of section .fini:

0000000000000000 <_fini>:
   0:   48 83 ec 08             sub    $0x8,%rsp
root@master:tmp#
可以看到
<_init>便应是_init()函数的开始部分;<_fini>便应是_init()函数的结尾部分/usr/lib/gcc/x86_64-redhat-linux/4.8.5/crtbegin.o: 由 GCC 实现,用于构造全局对象和遍历执行析构函数(待验证)这个文件有点复杂,以后再分析吧
./a.o: 待链接的 obj 文件。程序员开发的程序(在这里是 Hello World 程序)同样可以反汇编我们的代码看看:
1
2
3
4
5
6
7
8
9
10
11
12
13
14
15
16
17
18
19
20
21
root@master:tmp# objdump -dr a.o

a.o:     file format elf64-x86-64


Disassembly of section .text:

0000000000000000 <main>:
   0:   55                      push   %rbp
   1:   48 89 e5                mov    %rsp,%rbp
   4:   48 83 ec 10             sub    $0x10,%rsp
   8:   89 7d fc                mov    %edi,-0x4(%rbp)
   b:   48 89 75 f0             mov    %rsi,-0x10(%rbp)
   f:   bf 00 00 00 00          mov    $0x0,%edi
                        10: R_X86_64_32 .rodata
  14:   e8 00 00 00 00          callq  19 <main+0x19>
                        15: R_X86_64_PC32       puts-0x4
  19:   b8 00 00 00 00          mov    $0x0,%eax
  1e:   c9                      leaveq
  1f:   c3                      retq
root@master:tmp#
可以看到其中有两个需要重定位的地址,一是
.rodata的地址,二是puts的地址。puts自不必说,因为它需要链接了libc.so后才会填充正确的地址,但是.rodata是什么呢?1 2 3 4 5 6 7 8 9 10 11 12 13 14 15 16 17 18 19 20
root@master:tmp# objdump -s a.o a.o: file format elf64-x86-64 Contents of section .text: 0000 554889e5 4883ec10 897dfc48 8975f0bf UH..H....}.H.u.. 0010 00000000 e8000000 00b80000 0000c9c3 ................ Contents of section .rodata: 0000 48656c6c 6f207468 6520776f 726c6421 Hello the world! 0010 00 . Contents of section .comment: 0000 00474343 3a202847 4e552920 342e382e .GCC: (GNU) 4.8. 0010 35203230 31353036 32332028 52656420 5 20150623 (Red 0020 48617420 342e382e 352d3238 2900 Hat 4.8.5-28). Contents of section .eh_frame: 0000 14000000 00000000 017a5200 01781001 .........zR..x.. 0010 1b0c0708 90010000 1c000000 1c000000 ................ 0020 00000000 20000000 00410e10 8602430d .... ....A....C. 0030 065b0c07 08000000 .[...... root@master:tmp#
可以看到
.rodata的内容就是我们的字符串Hello the world!。/lib/gcc/x86_64-redhat-linux/4.8.2/libgcc.a: 用于解决平台差异。比如在 32 位系统进行 64 位大数运算,编译器就不能直接产生正确的 CPU 指令,需要libgcc.a提供正确的函数对于这个文件而言,由于过于复杂,就不详细分析了
/lib/gcc/x86_64-redhat-linux/4.8.2/libgcc_eh.a: 包含了支持C++的异常处理的平台相关函数同上
/lib64/libc-2.17.so(动态链接)或/lib/debug/usr/lib64/libc.a(静态链接): 这就是 C 语言标准库中函数真正实现的地方。以前我就在想,C 语言的头文件可以找到,其中的内容也能看到,知道了 Linux 对于 C 的文档支持后也能直接使用
man命令查看它们的使用文档,但是一直没有想通的问题是,如何查看 C 语言标准库中的实现代码(网上下载源码的不算),尤其是在使用过 Java 之后这样的想法更加强烈(因为在 IDEA 或 Eclipse 中可以直接使用Ctrl+鼠标左键到达函数定义的地方查看源码)。我之前想的是,既然引用了相应的头文件(如
stdio.h)就能使用相应的函数(如printf),那么必然在编译的过程中加入了相关的源文件(如stdio.c),但是即便我后来学会了find命令也没有找到这样的源文件。于是我懵逼了后来才发现,Java 之所以可以直接看到源码是因为附了一个源码包
src.zip,其中的目录结构和标准库的类的目录结构是对应的,因此才能直接看到源码。因此才认识到源码和实现是分开的,Java 中的实现是类文件,而 Linux 下 C 的实现是 obj 文件(*.o)及由 obj 文件生成的静态库(libc.a)和动态库(libc.so)。而且默认情况下,Linux 的编译(如使用
gcc)都会使用动态链接的方式,即链接动态库libc.so。链接后生成了可执行文件(如a.out),然后执行这个可执行文件时再动态引用libc.so中的相关函数所以,想在编写 C 程序的时候能看到实现代码是比较麻烦的。不过知道 C 标准库的实现位置是在
libc.so中也足够了/usr/lib/gcc/x86_64-redhat-linux/4.8.5/crtend.o: 由 GCC 实现,用于构造全局对象和遍历执行析构函数(待验证)这个文件有点迷,以后再分析吧
/lib64/crtn.o: 用来辅助完成.finit段的收集以实现初始化工作。而crtn.o实际上包含的便是_finit()函数的开始和结尾部分和
crti.o类似,故不再赘述
实践
实践出真知,下面让我们完整地走一遍 C 程序的编译过程
我们依然使用之前在用的 Hello Word 程序:
1
2
3
4
5
6
#include <stdio.h>
int main(int argc, char *argv[])
{
  printf("Hello the world!\n");
  return 0;
}
依次执行前文所述的命令:
1
2
3
4
5
6
7
8
9
10
11
12
13
root@master:tmp# ls
a.c
root@master:tmp# cpp a.c -o a.i
root@master:tmp# gcc a.i -std=c99 -S -o a.s
root@master:tmp# as a.s -o a.o
root@master:tmp# ls
a.c  a.i  a.o  a.s
root@master:tmp# ld /lib64/crt1.o /lib64/crti.o /usr/lib/gcc/x86_64-redhat-linux/4.8.5/crtbegin.o a.o -L/usr/lib/gcc/x86_64-redhat-linux/4.8.5/ -L/lib64/ -start -lgcc -lgcc_eh -lc -end  /usr/lib/gcc/x86_64-redhat-linux/4.8.5/crtend.o /lib64/crtn.o
root@master:tmp# ls
a.c  a.i  a.o  a.out  a.s
root@master:tmp# ./a.out
Hello the world!
root@master:tmp#
结语
现在我们对 C 语言的编译过程已经有了基本的了解,以后再遇到相关问题的时候就不会那么“虚”了。
一般情况下,我们只需要知道整个 C 程序的编译过程分成编译和链接两个阶段即可。编译阶段将源程序(*.c) 转换成为目标代码(*.o)(这里的编译实际包含了上述的预处理、编译和汇编),链接阶段则是把目标代码(*.o)与调用的库函数对应的代码连接起来形成对应的可执行文件(*.out)
如果想进一步深入的话可以考虑阅读一下《现代编译原理:C语言描述(修订版)》
运行过程
如前所述,在操作系统中,执行一个 C 程序(即便是只有几条语句的 Hello World 程序)并非简单地从main函数开始到return 0结束那么简单。
事实上,C 程序的运行离不开 C 的运行库,即 CRT(C RunTime library)。在 Linux 中,CRT 即libc.so;在 Windows 中,CRT 即 MSVC CRT(现在好像叫ucrt1)
运行过程则为:
- 加载器指示操作系统如何开始运行可执行文件(
./a.out)
运行程序前需要链接动态库。对于 Linux 中的 C 程序而言,标准函数库(如printf、puts等)的具体实现在动态链接库libc-<version>.so中(当然,具体位置取决于具体的 Linux 发行版。于我的 CentOS 7.2 而言是/lib64/libc-2.17.so)。
而事实上,运行一个 C 程序并非只需要动态链接libc.so就可以了,相反,它还需要链接很多其它的动态库,如/lib64/ld-2.17.so(/lib64/ld-linux-x86-64.so.2实质上是它的一个软链接)等
在 Linux 中,大量常用的工具都依赖于libc.so
然而,在 Windows 上,CRT 是随着 VS 的发布而发布的,并非系统自带。即在 Windows 上,没有一个系统范围的libc。正因如此,很多应用程序选择自带一份正确版本的 CRT(通常置于自己的安装目录下)。2
众所周知,编写 C 程序时需要引入stdio.h等标准函数库,那么在不同的平台上这些库的实现在哪里呢?对于 Linux 而言,通常是glibc;对于 Windows 而言,通常是 MSVC CRT。当然,还有其它各种 CRT,比如针对嵌入式系统的
了解其重要性:
1
2
3
4
5
6
7
8
9
10
11
12
root@master:~# mv /lib64/libc-2.17.so .
root@master:~# ls
ls: error while loading shared libraries: libc.so.6: cannot open shared object file: No such file or directory
root@master:~# gcc -std=c11 -v d.c
gcc: error while loading shared libraries: libc.so.6: cannot open shared object file: No such file or directory
root@master:~# mv libc-2.17.so /lib64/
mv: error while loading shared libraries: libc.so.6: cannot open shared object file: No such file or directory
root@master:~# LD_PRELOAD=/root/libc-2.17.so
root@master:~# ls
ls: error while loading shared libraries: libc.so.6: cannot open shared object file: No such file or directory
root@master:~# LD_PRELOAD=/root/libc-2.17.so mv libc-2.17.so /lib64
root@master:~#
MSVC CRT
MSVC 即 Microsoft Visual C++ 的缩写,它使用的 CRT 自从 2015 年后已经重构为 UCRT (Universal CRT),全面支持 C99 标准,部分支持 C11(推测)。
下面,我们进行简单验证。
首先我们安装好 Visual Studio,因为 Visual Studio 会提供 UCRT。对于 VS 的命令行编译工具使用帮助可参见 Use the Microsoft C++ toolset from the command line | Microsoft Docs
由于我对它们不熟,相应地,我更熟悉 Linux 下的编译工具。因此我选择安装 LLVM (其中包含我们会用到的 clang)
好了,有了 UCRT 和 clang 后,我们来进行验证:
首先我们写个简单的 C 程序
b.c:1 2 3 4 5 6
#include <stdio.h> int main(){ printf("std: %ld",__STDC_VERSION__); return 0; }
然后我们使用
clang编译(-v打开详细开关):1 2 3 4 5 6 7 8 9 10 11 12 13 14 15 16 17 18 19
C:\Users\wsxq2>clang -v b.c clang version 8.0.1 (tags/RELEASE_801/final) Target: x86_64-pc-windows-msvc Thread model: posix InstalledDir: C:\Program Files\LLVM\bin "C:\\Program Files\\LLVM\\bin\\clang.exe" -cc1 -triple x86_64-pc-windows-msvc19.21.27702 -emit-obj -mrelax-all -mincremental-linker-compatible -disable-free -disable-llvm-verifier -discard-value-names -main-file-name b.c -mrelocation-model pic -pic-level 2 -mthread-model posix -fmath-errno -masm-verbose -mconstructor-aliases -munwind-tables -target-cpu x86-64 -dwarf-column-info -momit-leaf-frame-pointer -v -resource-dir "C:\\Program Files\\LLVM\\lib\\clang\\8.0.1" -internal-isystem "C:\\Program Files\\LLVM\\lib\\clang\\8.0.1\\include" -internal-isystem "D:\\Program Files (x86)\\MVS\\IDE\\VC\\Tools\\MSVC\\14.21.27702\\include" -internal-isystem "D:\\Windows Kits\\10\\Include\\10.0.17763.0\\ucrt" -internal-isystem "D:\\Windows Kits\\10\\include\\10.0.17763.0\\shared" -internal-isystem "D:\\Windows Kits\\10\\include\\10.0.17763.0\\um" -internal-isystem "D:\\Windows Kits\\10\\include\\10.0.17763.0\\winrt" -fdebug-compilation-dir "C:\\Users\\wsxq2" -ferror-limit 19 -fmessage-length 188 -fno-use-cxa-atexit -fms-extensions -fms-compatibility -fms-compatibility-version=19.21.27702 -fdelayed-template-parsing -fobjc-runtime=gcc -fdiagnostics-show-option -fcolor-diagnostics -o "C:\\Users\\wsxq2\\AppData\\Local\\Temp\\b-77f1ef.o" -x c b.c -faddrsig clang -cc1 version 8.0.1 based upon LLVM 8.0.1 default target x86_64-pc-windows-msvc #include "..." search starts here: #include <...> search starts here: C:\Program Files\LLVM\lib\clang\8.0.1\include D:\Program Files (x86)\MVS\IDE\VC\Tools\MSVC\14.21.27702\include D:\Windows Kits\10\Include\10.0.17763.0\ucrt D:\Windows Kits\10\include\10.0.17763.0\shared D:\Windows Kits\10\include\10.0.17763.0\um D:\Windows Kits\10\include\10.0.17763.0\winrt End of search list. "D:\\Program Files (x86)\\MVS\\IDE\\VC\\Tools\\MSVC\\14.21.27702\\bin\\HostX64\\x64\\link.exe" -out:a.exe -defaultlib:libcmt "-libpath:D:\\Program Files (x86)\\MVS\\IDE\\VC\\Tools\\MSVC\\14.21.27702\\lib\\x64" "-libpath:D:\\Windows Kits\\10\\Lib\\10.0.17763.0\\ucrt\\x64" "-libpath:D:\\Windows Kits\\10\\Lib\\10.0.17763.0\\um\\x64" -nologo "C:\\Users\\wsxq2\\AppData\\Local\\Temp\\b-77f1ef.o" C:\Users\wsxq2>
注意其中的
D:\Windows Kits\10\Include\10.0.17763.0\ucrt目录:1 2 3 4 5 6 7 8 9 10 11 12 13 14 15 16 17 18 19 20 21 22 23 24 25 26 27 28
C:\Users\wsxq2>dir "D:\Windows Kits\10\Include\10.0.17763.0\ucrt" /b ... malloc.h math.h mbctype.h mbstring.h memory.h minmax.h new.h process.h safeint.h safeint_internal.h search.h share.h signal.h stddef.h stdio.h stdlib.h string.h sys tchar.h tgmath.h time.h uchar.h wchar.h wctype.h C:\Users\wsxq2>
可见其中包含了标准 C 中的所有头文件且其对
再然后我们将其运行:
1
2
3
C:\Users\wsxq2>a.exe
std: 201112
C:\Users\wsxq2>
由于
clang从 3.6 版本开始默认使用 C11 标准,因此我们看到宏__STDC_VERSION__的值为201112
C Run-Time Library Reference | Microsoft Docs
预处理
gcc -E(预处理)输出内容解读:Preprocessor Output - The C Preprocessor
编译
主流编译器
GCC
gcc 是 GNU Compiler Collection 的缩写,是一个开源的编译器套件,支持多种编程语言,包括 C、C++、Fortran、Ada 和 Go 等。gcc 是 GNU 操作系统的核心组件之一,也是 Linux 系统上最常用的编译器。
遇到过的问题:
- c++ - How to tell where a header file is included from? - Stack Overflow:gcc
-M和-H参数 #warning有时不好使?原因未知,但应和gcc参数有关·- gcc - C preprocessor: expand macro in a #warning - Stack Overflow
clang
clang 是一个 C/C++/Objective-C 编译器,属于 LLVM 项目的一部分。它是一个开源项目,旨在提供一个高性能的编译器基础设施。clang 的设计目标是提供快速的编译速度、良好的错误和警告信息、以及对 C/C++ 标准的高度兼容性。
- JSON Compilation Database Format Specification — Clang 13 documentation
- How To Setup Clang Tooling For LLVM — Clang 13 documentation
- ClangCheck — Clang 13 documentation
汇编
汇编语言是计算机程序设计语言的一种,它与机器语言有一一对应的关系。汇编语言通常使用助记符来表示机器指令,并且可以使用符号来表示内存地址和数据。
汇编语言有两种主要的语法风格:Intel 和 AT&T。Intel 语法是由 Intel 公司开发的,主要用于 x86 架构的处理器;而 AT&T 语法是由 AT&T 公司开发的,主要用于 UNIX 系统。下面详细说明。
Intel vs AT&T
Intel and AT&T Syntax.
Intel and AT&T syntax Assembly language are very different from each other in appearance, and this will lead to confusion when one first comes across AT&T syntax after having learnt Intel syntax first, or vice versa. So lets start with the basics.
Prefixes.
In Intel syntax there are no register prefixes or immed prefixes. In AT&T however registers are prefixed with a
%and immed’s are prefixed with a$. Intel syntax hexadecimal or binary immed data are suffixed withhandbrespectively. Also if the first hexadecimal digit is a letter then the value is prefixed by a0.Example:
Intex Syntax AT&T Syntax mov eax,1movl $1,%eaxmov ebx,0ffhmovl $0xff,%ebxint 80hint $0x80Direction of Operands.
The direction of the operands in Intel syntax is opposite from that of AT&T syntax. In Intel syntax the first operand is the destination, and the second operand is the source whereas in AT&T syntax the first operand is the source and the second operand is the destination. The advantage of AT&T syntax in this situation is obvious. We read from left to right, we write from left to right, so this way is only natural.
Example:
Intex Syntax AT&T Syntax instr dest,sourceinstr source,destmov eax,[ecx]movl (%ecx),%eaxMemory Operands.
Memory operands as seen above are different also. In Intel syntax the base register is enclosed in
[and]whereas in AT&T syntax it is enclosed in(and).Example:
Intex Syntax AT&T Syntax mov eax,[ebx]movl (%ebx),%eaxmov eax,[ebx+3]movl 3(%ebx),%eaxThe AT&T form for instructions involving complex operations is very obscure compared to Intel syntax. The Intel syntax form of these is
segreg:[base+index*scale+disp]. The AT&T syntax form is%segreg:disp(base,index,scale).
index/scale/disp/segregare all optional and can simply be left out.scale, if not specified andindexis specified, defaults to1.segregdepends on the instruction and whether the app is being run in real mode or pmode. In real mode it depends on the instruction whereas in pmode its unnecessary. Immediate data used should not$prefixed in AT&T when used forscale/disp.Example:
Intel Syntax AT&T Syntax instr foo,segreg:[base+index*scale+disp]instr %segreg:disp(base,index,scale),foomov eax,[ebx+20h]movl 0x20(%ebx),%eaxadd eax,[ebx+ecx*2h]addl (%ebx,%ecx,0x2),%eaxlea eax,[ebx+ecx]leal (%ebx,%ecx),%eaxsub eax,[ebx+ecx*4h-20h]subl -0x20(%ebx,%ecx,0x4),%eaxAs you can see, AT&T is very obscure.
[base+index*scale+disp]makes more sense at a glance thandisp(base,index,scale).Suffixes.
As you may have noticed, the AT&T syntax mnemonics have a suffix. The significance of this suffix is that of operand size.
lis forlong,wis forword, andbis forbyte. Intel syntax has similar directives for use with memory operands, i.e.byte ptr,word ptr,dword ptr.dwordof course corresponding tolong. This is similar to type casting in C but it doesnt seem to be necessary since the size of registers used is the assumed datatype.Example:
Intel Syntax AT&T Syntax mov al,blmovb %bl,%almov ax,bxmovw %bx,%axmov eax,ebxmovl %ebx,%eaxmov eax, dword ptr [ebx]movl (%ebx),%eax——引用自 Intel and AT&T Syntax
另请参见:
gdb:
1
set disassembly-flavor att|intel
objdump:
1
objdump -M intel|att -d a.out >a.s
8086
参见另一博客 16位汇编程序设计
x86_i86(IA-32)
普林斯顿大学课程资源:
- PPT课件:Index of /courses/archive/spr11/cos217/lectures
- 主页(含参考资料):COS 217, Spring 2011: General Information
其他:
- IA-32 Intel® Architecture Software Developer’s Manual, Volume 1: Basic Architecture
- IA-32 Intel® Architecture Software Developer’s Manual, Volume 2: Instruction Set Reference
x86_64
在学习了前2者的前提下可自行摸索
ARM
ARMv8
普林斯顿大学课程资源:
- 主页(含参考资料):COS 217, Spring 2019: General Information
- PPT课件:Index of /courses/archive/spr19/cos217/lectures
其他:
- ARM Architecture Reference Manual ARMv8, for ARMv8-A architecture profile
- ARMv8 Instruction Set Overview
关于普林斯顿:
分析案例
怀疑是锁函数(arch_write_lock)导致的内存越界访问,修改了不该修改的内存。以下是该函数的代码:
1
2
3
4
5
6
7
8
9
10
11
12
13
14
15
static inline void arch_write_lock(arch_rwlock_t *rw)
{
	unsigned int tmp;

	asm volatile(
	"	sevl\n"
	"1:	wfe\n"
	"2:	ldaxr	%w0, %1\n"
	"	cbnz	%w0, 1b\n"
	"	stxr	%w0, %w2, %1\n"
	"	cbnz	%w0, 2b\n"
	: "=&r" (tmp), "+Q" (rw->lock)
	: "r" (0x80000000)
	: "memory");
}
以及GDB反汇编结果:
1
2
3
4
5
6
7
8
9
10
11
12
13
14
15
16
17
18
Dump of assembler code for function arch_write_lock:
   0x0000000001bd036c <+0>:     sub     sp, sp, #0x20
   0x0000000001bd0370 <+4>:     str     x0, [sp, #8]
   0x0000000001bd0374 <+8>:     ldr     x2, [sp, #8]
   0x0000000001bd0378 <+12>:    mov     w1, #0x80000000                 // #-2147483648
   0x0000000001bd037c <+16>:    ldr     x0, [sp, #8]
   0x0000000001bd0380 <+20>:    sevl
   0x0000000001bd0384 <+24>:    wfe
   0x0000000001bd0388 <+28>:    ldaxr   w3, [x2]
   0x0000000001bd038c <+32>:    cbnz    w3, 0x1bd0384 <arch_write_lock+24>
   0x0000000001bd0390 <+36>:    stxr    w3, w1, [x2]
=> 0x0000000001bd0394 <+40>:    cbnz    w3, 0x1bd0388 <arch_write_lock+28>
   0x0000000001bd0398 <+44>:    nop
   0x0000000001bd039c <+48>:    mov     w0, w3
   0x0000000001bd03a0 <+52>:    str     w0, [sp, #28]
   0x0000000001bd03a4 <+56>:    nop
   0x0000000001bd03a8 <+60>:    add     sp, sp, #0x20
   0x0000000001bd03ac <+64>:    ret
通过查阅前述的ARMv8指令集文档及搜索某些复杂指令,最后再结合arm架构下spinlock原理 (代码解读)_adaptiver的专栏-CSDN博客_spinlock实现原理中以下部分的说明,终于理解了上述函数的功能:

从而证明踩内存事件与该函数无关
遇到过的问题
- assembly - What does NOPL do in x86 system? - Stack Overflow
- MOVZ Instruction
- X86-assembly/Instructions/shl - aldeid
- ARM64架构的寄存器_TNT的博客-CSDN博客_arm64 寄存器
- amd64 - What is the meaning of movabs in gas/x86 AT&T syntax? - Reverse Engineering Stack Exchange
- MMX (instruction set) - Wikipedia
- Streaming SIMD Extensions - Wikipedia
- FLAGS register - Wikipedia
语言特性
“意外”的特性
case 后只能接语句不能接声明
如下代码会报错:
1
2
3
4
5
6
7
8
9
10
11
12
#include <stdio.h>
int main(int argc, char *argv[])
{
  int a=0;
  switch(a){
    case 0:
      int b=3;
      printf("%d\n", b);
      break;
  }
  return 0;
}
gcc 报错:
1
2
3
4
b.c: In function ‘main’:
b.c:7:7: error: a label can only be part of a statement and a declaration is not a statement
       int b=3;
              ^
clang 报错:
1
2
3
4
5
6
7
b.c:7:7: error: expected expression
      int b=3;
      ^
b.c:8:22: error: use of undeclared identifier 'b'
      printf("%d\n", b);
                     ^
2 errors generated.
解决方法:
使用空语句:
1
2
3
4
5
6
7
8
9
10
11
12
13
#include <stdio.h>
int main(int argc, char *argv[])
{
  int a=0;
  switch(a){
    case 0:
      ;
      int b=3;
      printf("%d\n", b);
      break;
  }
  return 0;
}
使用块:
1
2
3
4
5
6
7
8
9
10
11
12
13
14
#include <stdio.h>
int main(int argc, char *argv[])
{
  int a=0;
  switch(a){
    case 0:
    {
      int b=3;
      printf("%d\n", b);
      break;
    }
  }
  return 0;
}
参见 c - Label can only be used as part of a statement Error - Stack Overflow
结构体与联合体初始化
参见 结构体与联合体初始化 - cppreference.com
1
2
3
4
5
6
7
8
9
10
11
12
13
14
15
16
17
18
19
20
21
22
23
24
25
26
27
28
29
30
31
32
33
34
35
36
37
38
39
#include <stdio.h>
#include <time.h>

int main(void) {
  char buff[70];
  // struct tm {
  //     int tm_sec;	   /* seconds */
  //     int tm_min;	   /* minutes */
  //     int tm_hour;	   /* hours */
  //     int tm_mday;	   /* day of the month */
  //     int tm_mon;	   /* month */
  //     int tm_year;	   /* year */
  //     int tm_wday;	   /* day of the week */
  //     int tm_yday;	   /* day in the year */
  //     int tm_isdst;	   /* daylight saving time */
  // };
	// ——引用自 `man ctime`
  struct tm my_time1 = {20, 20, 10, 1, 8, 119};
  struct tm my_time2 = {.tm_year = 119,
                        .tm_mon = 8,
                        .tm_mday = 1,
                        .tm_hour = 10,
                        .tm_min = 20,
                        .tm_sec = 20};
  int year = 119, month = 8, day = 1;
  struct tm my_time3 = {.tm_year = year,
                        .tm_mon = month,
                        .tm_mday = day,
                        .tm_hour = 10,
                        .tm_min = 20,
                        .tm_sec = 20};

  strftime(buff, sizeof buff, "%F %T", &my_time1);
  puts(buff);
  strftime(buff, sizeof buff, "%F %T", &my_time2);
  puts(buff);
  strftime(buff, sizeof buff, "%F %T", &my_time3);
  puts(buff);
}
全局变量是否应该初始化
全局变量默认初始为0,但是需要注意的是,如果有两个地方定义的同名的全局变量,但一边手动初始化,另一边没有手动初始化,编译时却不会报错。如果希望报错,需要给编译器加选项-fno-common。例如:
1
2
3
4
5
6
7
8
9
10
11
12
13
14
15
16
17
18
19
20
21
22
23
24
25
    /* module_a.c */
    #include <stdio.h>

    void function(void);

    int global = 0;

    int main()
    {
        global = 3;
        function();
        printf("main: %d \n", global);
        return 0;
    }
    /* module_b.c */
    #include <stdio.h>

    int global;

    void function(void)
    {
        global = 6;
        printf("function: %d \n", global);
        return 0;
    }
因此,答案是可以不手动初始化,但必需使用编译选项-fno-common
更多信息参见为什么全局变量一定要初始化?_aiduan6474的博客-CSDN博客
结构体对齐
结构体对齐__attribute__((__aligned__(a))),如果a为64,表示64字节对齐,即sizeof(结构体) = N * 64。
0长数组
- C语言0长度数组(可变数组/柔性数组)详解_OSKernelLAB-CSDN博客
- Compiler Reference Guide: __attribute__((aligned)) variable attribute
数组 vs 指针
char a[1];(常量) vs char *a;(变量)
warning: implicit declaration of function ‘isxdigit’
直接在.c文件中添加:
1
include <ctype.h>
或者:
1
extern int isxdigit(int c);
或者:
1
int isxdigit(int c);
声明vs定义
declaration - Declaring functions and variables multiple times in C++ - Stack Overflow
随机数
参见man srand中的EXAMPLE
assert
extern
代码格式化
- clang-format
- astyle
静态代码分析
- tscancode
- clang中的scan-build
- clang-tidy
单元测试
一个 queue.c 模块的例子:
1
2
3
4
5
6
7
8
9
10
11
12
13
14
15
16
17
18
19
20
21
22
23
24
25
26
27
28
29
30
31
32
#ifdef Q_UNIT_TEST
#include <assert.h>
int main(int argc, char *argv[])
{
    bool ret;
    q_queue q;
    ret = q_create(&q, Q_MSG_MAX_SIZE);
    assert(ret == true);

    q_message msg={0};
    q_enqueue(&q, &(q_message){0,3,{'a','b','c'}});
    ret = q_enqueue(&q, &(q_message){1,2,{'a','b'}});
    assert(ret == true);
    ret = q_enqueue(&q, &(q_message){2,2,{'a','b'}});
    assert(ret == true);
    ret=q_enqueue(&q, &(q_message){3,2,{'a','b'}});
#ifdef Q_KEEP_NEWEST
    assert(ret == true);
#else
    assert(ret == false);
#endif
    q_traverse(&q);
    q_dequeue(&q, &msg);
    q_print_msg(&msg);
    q_dequeue(&q, &msg);
    ret = q_dequeue(&q, &msg);
    assert(ret == true);
    ret = q_dequeue(&q, &msg);
    assert(ret == false);
    return 0;
}
#endif
完整代码参见 queue.c
时间和日期工具
获取低于秒级的时间
There is no ANSI C function that provides better than 1 second time resolution but the POSIX function gettimeofday provides microsecond resolution. The clock function only measures the amount of time that a process has spent executing and is not accurate on many systems.
——引用自 portability - How to measure time in milliseconds using ANSI C? - Stack Overflow
即 C89/90(也叫 ANSI C,标准 C)不提供低于秒级的时间获取函数。但是 C11 后提供一个跨平台的获取纳秒级的函数timespec_get。该函数在 Linux 中直接调用了 POSIX 的clock_gettime函数3。支持 C11 的编译器很多,包括 GCC 4.6 及其之后的版本(GCC 4.6 使用-std=c1x,4.7 开始使用-std=c11)、clang 3.1 及其之后的版本(使用参数-std=c11,LLVM 3.6 后默认使用 C11)等等4
然而微软的 Visual Studio 自 C99 后便未更新其 C 标准了4,即微软的 VS 不支持通过 C 语言标准函数获取低于秒级的时间(但是说不定可以通过 Windows 的系统调用?)。
另外,当前(2019-09-01)最新的 C 标准是于 2018-06 推出的 C18(也叫 C17),用于替代 C11,会被 C2X 取代。支持 C18 的编译器有 GCC 8.1.0、LLVM Clang 7.0.0 等。5
此外,对于 Linux,其获取时间的函数非常多,包括time、clock、getrusage、clock_gettime、gettimeofday、timespec_get等等,这里有一个它们的比较的回答: c - Measure time in Linux - time vs clock vs getrusage vs clock_gettime vs gettimeofday vs timespec_get? - Stack Overflow
GDB
使用技巧
输出格式控制
set print pretty on
set print elements 0
set disassembly-flavor att |intel
进程相关
1
set follow-fork-mode child
源文件相关
1
2
set substitute-path /foo/bar /mnt/cross
directory /fw_dat/ #详情参见How to point GDB to your sources | There is no magic here
调试相关
使用h <command>查看帮助
堆栈
fbt -2 fullinfo frame
线程
thread applythread apply all btinfo threadsthread <id>
打印变量
- ptype
- p
- x
- inf locals
- inf args
- inf variables
修改变量
set var
1
2
3
(gdb) set var a=3 # int a;
(gdb) set var $count = 0
(gdb) set var $foo = &{1.0}
set $list = (int *) malloc (10 * sizeof (int))print {1,2,3,4}[2]
关于convenience variable的更多信息可参见Convenience Vars (Debugging with GDB)
流程控制
- jump
- return
- finish
The return command does not resume execution; it leaves the program stopped in the state that would exist if the function had just returned. In contrast, the finish command (see section Continuing and stepping) resumes execution until the selected stack frame returns naturally.
断点操作
commands
- silent
- end
- b lineno if xxx
condition x [if xxx]- ignore
观察点
1
2
3
watch
rwatch
awatch
汇编相关
输出控制
1
2
3
4
5
6
7
8
9
10
h disassemble
disassemble
disassemble /m
layout split
objdump -S
x /12i $pc
display/3i $pc
undisplay xxx
set  disassemble-next-line on
show disassemble-next-line
gdb - View Both Assembly and C code - Stack Overflow
Show current assembly instruction in GDB - Stack Overflow
流程控制
1
2
ni #nexti
si #stepi
寄存器
Registers (Debugging with GDB)
自定义命令
常用命令:
1
2
3
show user
help user-defined
define abc
例子:
1
2
3
4
5
6
7
8
9
define adder
  set $i = 0
  set $sum = 0
  while $i < $argc
    eval "set $sum = $sum + $arg%d", $i
    set $i = $i + 1
  end
  print $sum
end
详情参见Define (Debugging with GDB)
保存断点
above GDB 7.2
save breakpoints <filename>
Save all current breakpoint definitions to a file suitable for use
in a later debugging session. To read the saved breakpoint
definitions, use the `source’ command.
below GDB 7.2
1
2
3
4
5
6
7
8
9
10
11
12
13
14
15
16
17
18
19
20
21
.gdbinit:

define bsave
    shell rm -f brestore.txt
    set logging file brestore.txt
    set logging on
    info break
    set logging off
    # Reformat on-the-fly to a valid GDB command file
    shell perl -n -e 'print "break $1\n" if /^\d+.+?(\S+)$/g' brestore.txt > brestore.gdb
end
document bsave
  store actual breakpoints
end

define brestore
  source brestore.gdb
end
document brestore
  restore breakpoints saved by bsave
end
详情参见c++ - Getting GDB to save a list of breakpoints - Stack Overflow
使用案例
在N次循环时打断点
1
2
(gdb) set var $count = 0
(gdb) break file.c:888 if ++$count == 1000
计算函数耗时
1
2
3
4
5
6
7
8
9
(gdb) set var $start=(struct timeval *) malloc(sizeof(struct timeval))
(gdb) set var $end =(struct timeval *) malloc(sizeof(struct timeval))
(gdb) b fun1
(gdb) c
(gdb) call gettimeofday($start,0)
(gdb) b +20
(gdb) c
(gdb) call gettimeofday($end,0)
(gdb) p ((end.tv_sec*1000*1000+end.tv_usec)-(start.tv_sec*1000*1000+start.tv_usec))
可以使用define封装成一个gdb command,可参考:
1
2
3
4
5
6
7
8
9
define timeme
set $last=clock()
n
set $timing=clock() - $last
if $timing>$arg0
printf "***long***\n"
end
printf "%d cycles, %f seconds\n", $timing, (float)$timing / 1000000
end
gdb break if called from
遇到过的问题
- c - Jumping to the next “instruction” using gdb - Stack Overflow
- Show current assembly instruction in GDB - Stack Overflow
- ReverseDebug - GDB Wiki
- debugging - Return a value via a gdb user-defined command - Stack Overflow
- gdb user-defined command if break while loop - Google Search
- gdb - Dwarf Error: wrong version in compilation unit header (is 4, should be 2) - Stack Overflow:编译较新版本GDB即可
- debugging - How can I make gdb save the command history? - Stack Overflow
推荐参考资料
构建系统
构建系统是一个用于自动化构建软件的工具。它通常会根据源代码和配置文件生成可执行文件、库文件等目标文件。构建系统可以帮助开发者管理项目的依赖关系、编译选项和构建过程,从而提高开发效率。
C 语言的构建系统有很多,包括 cmake、make、autotools、scons、ninja 等等。它们各有优缺点,适用于不同的场景。
compile_commands.json
定义:JSON Compilation Database Format Specification — Clang 13 documentation
compile_commands.json是一个非常有用的文件,它长这样:
1
2
3
4
5
6
7
8
[
    {
        "command": "。。。",
        "directory": "。。。",
        "file": "。。。"
    },
...
]
如何生成这个文件呢?对于cmake而言,只需传入一个额外的参数-DCMAKE_EXPORT_COMPILE_COMMANDS=ON即可
对于基于Makefile的构建系统,则需要安装辅助工具,例如bear:
安装方法如下(CentOS推荐从源码安装,且推荐编译旧版本,如2.1.5):
- Bear/INSTALL.md at master · rizsotto/Bear
Installing Bear from a binary package
如何使用它呢?非常简单,只需在make命令前加上bear即可:
1
  bear make
这样即可得到 compile_commands.json
二进制分析
目标文件
以下是常见的目标文件格式:
- .o 文件
- 可执行文件
- 静态库
- 动态库
相关工具
binutils
使用如下命令即可获取该软件包中的所有命令:
1
rpm -ql binutils |grep bin/
下面只列举其中比较常用的
as
汇编命令。将汇编代码转换为目标文件(.o文件)
ar
ar 用于创建、修改、解压*.a文件(静态库文件):
DESCRIPTION
The GNU ar program creates, modifies, and extracts from archives. An archive is a single file holding a collection of other files in a structure that makes it possible to retrieve the original individual files (called members of the archive).
The original files’ contents, mode (permissions), timestamp, owner, and group are preserved in the archive, and can be restored on extraction.
——引用自
man ar
常见用法:
1
2
3
ar r test.a a.o b.o
ar t /lib/debug/usr/lib64/libc.a
ar x /lib/debug/usr/lib64/libc.a ioputs.o
ld
链接命令。将多个.o文件链接成为一个.out文件(可执行文件)
nm
nm 用于列出目标文件(ELF 文件)中的符号(symbols):
DESCRIPTION
GNU nm lists the symbols from object files objfile…. If no object files are listed as arguments, nm assumes the file a.out.
For each symbol, nm shows:
· The symbol value, in the radix selected by options (see below), or hexadecimal by default.
· The symbol type. At least the following types are used; others are, as well, depending on the object file format. If lowercase, the symbol is usually local; if uppercase, the symbol is global (external). There are however a few lowercase symbols that are shown for special global symbols (“u”, “v” and “w”). … · The symbol name. ——引用自
man nm
例如:
1
2
nm a.out
nm a.o
objdump
objdump 用于获取目标文件(ELF 文件)的信息:
DESCRIPTION
objdump displays information about one or more object files. The options control what particular information to display. This information is mostly useful to programmers who are working on the compilation tools, as opposed to programmers who just want their program to compile and work.
objfile… are the object files to be examined. When you specify archives, objdump shows information on each of the member object files.
— —引用自
man objdump
事实上,可执行文件也是可以的(*.out)
常见用法:
1
2
3
4
5
6
7
8
9
10
11
12
13
objdump -dr a.o
objdump -h a.o
objdump -s a.o
objdump -x a.o
objdump -t a.o
objdump -T /lib64/libc-2.17.so
objdump -r a.o
objdump -R /lib64/libc-2.17.so
objdump -l -F -S -d a.out > a.s
objdump -M intel -d a.out >a.s
objdump -M amd-64 -d a.out >a.s
objdump -EB/EL -d a.out >a.s
objdump -I mcp/xxx sicuggio.bin
readelf
和objdump类似,只是更详细且不依赖于bfd库
readelf 用于显示目标文件(ELF 文件)的信息:
DESCRIPTION
readelf displays information about one or more ELF format object files. The options control what particular information to display.
elffile… are the object files to be examined. 32-bit and 64-bit ELF files are supported, as are archives containing ELF files.
This program performs a similar function to objdump but it goes into more detail and it exists independently of the BFD library, so if there is a bug in BFD then readelf will not be affected. ——引用自
man readelf
可以看到,相比于objdump,使用readelf或者是个更好的选择
那么什么样的文件才是 ELF 文件呢?其实 obj 文件(*.o)和可执行文件(*.out)均是 ELF 文件:
1
2
3
4
5
root@master:tmp# file a.o
a.o: ELF 64-bit LSB relocatable, x86-64, version 1 (SYSV), not stripped
root@master:tmp# file a.out
a.out: ELF 64-bit LSB executable, x86-64, version 1 (SYSV), dynamically linked (uses shared libs), for GNU/Linux 2.6.32, BuildID[sha1]=b6fb3c9862f6b1ea47b8f71042b0184aec3c961f, not stripped
root@master:tmp#
因此,它们都可以使用readelf命令来查看信息:
1
2
readelf --relocs a.o
readelf --relocs a.out
strings
显示obj文件中的可打印字符
strip
删除obj文件中的标志
glibc-common
ldd
查看某个可执行文件依赖于哪些动态库。由于其可能执行该可执行文件,从而导致安全问题,所以man ldd中推荐使用objdump -p |grep NEEDED命令来代替
常用函数
这部分是笔者在使用 C 语言编程的过程,总结的时常需要使用但又总是记不住的函数。分为标准库函数和Linux系统调用两部分
标准库函数(man 3 funname):
| 函数名 | 所在头文件 | 用法 |
|---|---|---|
| malloc | stdlib.h | void *malloc(size_t size); |
| free | stdlib.h | void free(void *ptr); |
| memcpy | string.h | void *memcpy(void *dest, const void *src, size_t n); |
| srand | stdlib.h | void srand(unsigned int seed); |
| rand | stdlib.h | int rand(void); |
| fopen | stdio.h | FILE *fopen(const char *path, const char *mode); |
| fread | stdio.h | size_t fread(void *ptr, size_t size, size_t nmemb, FILE *stream); |
| fwrite | stdio.h | size_t fwrite(const void *ptr, size_t size, size_t nmemb, FILE *stream); |
| fclose | stdio.h | int fclose(FILE *fp); |
| localtime | time.h | struct tm *localtime(const time_t *timep); |
| clock | time.h | clock_t clock(void); |
| strftime | time.h | size_t strftime(char *s, size_t max, const char *format, const struct tm *tm); |
| atoi | stdlib.h | int atoi(const char *nptr); |
Linux 系统调用(man 2 funname):
| 函数名 | 所在头文件 | 用法 |
|---|---|---|
| time | time.h | time_t time(time_t *t); |
| fork | unistd.h | pid_t fork(void); |
| socket | sys/socket.h | int socket(int domain, int type, int protocol); |
对于标准库函数可以使用man 3 FUNCTION查看该函数的更多信息,例如:
1
2
man 3 malloc
man 3 memcpy
对于Linux 系统调用可以使用man 2 FUNCTION查看该函数的更多信息,例如:
1
2
man 2 time
man 2 fork
更多获取帮助的相关内容参见 Linux 中的 C 语言文档支持
其它用过的函数:
1
2
3
4
5
opendir(3)
readdir(3)
stat(3)
getpwuid(3)
getgrgid(3)
遇到过的问题
- Executing Shell Commands from a C program
- Variadic Macros (The C Preprocessor)
- How to convert enum names to string in c - Stack Overflow
- Standard Predefined Macros - The C Preprocessor
- scanf regex - C - Stack Overflow
- How to prevent scanf causing a buffer overflow in C? - Stack Overflow
- 所有递归都可以改写成循环吗? - 知乎
relocation truncated to fit: R_X86_64_32S against ‘.bss’
GCC 编译错误 relocation truncated to fit: R_X86_64_32S against `.bss’_ai297313的专栏-CSDN博客
fclose() causes Segmentation Fault?
That’s normal, when you call
fclose(fp1)whenfp1isNULL.
atime vs mtime vs ctime?
mtime, or modification time, is when the file was last modified. When you change the contents of a file, itsmtimechanges.
ctime, or change time, is when the file’s property changes. It will always be changed when themtimechanges, but also when you change the file’s permissions, name or location.
atime, or access time, is updated when the file’s contents are read by an application or a command such as grep or cat.The easiest way to remember which is which is to read their alphabetical order:
Atimecan be updated aloneCtimewill updateatimeMtimewill update bothatimeandctime——引用自Knowing the difference between mtime, ctime and atime - Wiser Coder
Catch Ctrl-C in C?
详情参见 signals - Catch Ctrl-C in C - Stack Overflow
signal
1
2
3
4
5
6
7
8
9
10
11
12
13
14
15
16
17
#include <signal.h>
#include <stdbool.h>

bool volatile keepRunning = true;

void intHandler(int dummy) {
    keepRunning = false;
}

// ...

int main(void) {

   signal(SIGINT, intHandler);

   while (keepRunning) {
      // ...
sigaction
The behavior of signal() varies across UNIX versions, and has also varied historically across different versions of Linux. Avoid its use: use sigaction(2) instead. See Portability below.
——引用自
man 2 signal
即signal在 UNIX 中的兼容性不好,建议使用sigaction:
1
2
3
4
5
6
7
8
9
10
11
12
13
14
15
16
17
18
#include <signal.h>
#include <stdlib.h>

static bool keepRunning = true;

void intHandler(int) {
    keepRunning = false;
}

int main(int argc, char *argv[]) {
    struct sigaction act;
    act.sa_handler = intHandler;
    sigaction(SIGINT, &act, NULL);

    while (keepRunning) {
        // main loop
    }
}
Concatenating file with path to get full path in C?
1
2
3
4
5
6
7
8
char *dir="/etc";
char *filename="passwd";
/* + 2 because of the '/' and the terminating 0 */
char *fullpath = malloc(strlen(dir) + strlen(filename) + 2);
if (fullpath == NULL) { /* deal with error and exit */ }
sprintf(fullpath, "%s/%s", dir, filename);
/* use fullpath */
free(fullpath);
参见 https://stackoverflow.com/a/2153774
What is the difference between printf(“%s”), printf(s), fputs and puts?
printf("%s",s): correct but printf is a very heavy function and most compilers will actually replace it with puts in the compiler code if the format string ends with ‘\n’printf(s): very dangerous as the format string may contain % and then it will expect another parameters. If it happens it is UB. It also makes your code exploit pronefputs(s,stdout): OK. Not as heavy as printf and without a newline and support other streamputs(s): light and will add the new line
参见https://stackoverflow.com/a/54513018
How to append strings using sprintf?
1
2
3
4
5
6
7
8
#define MAX_LEN 1024
char output[3*MAX_LEN];
char *p=output;
p += snprintf(p, MAX_LEN, "Hello World");
p += snprintf(p, MAX_LEN, "Good Morning");
p += snprintf(p, MAX_LEN, "Good Afternoon");
*p='\0';
puts(output);
gets vs fgets?
Never use gets(). Because it is impossible to tell without knowing the data in advance how many characters gets() will read, and because gets() will continue to store characters past the end of the buffer, it is extremely dangerous to use. It has been used to break computer security. Use fgets() instead.
——引用自
man 3 getsBUGS 部分
如何定义常量?
1
2
#define PI 3.1415926f
const float pi = 3.1415926f;
如何判断操作系统采用的是大端储存还是小端存储?
1
2
3
4
5
6
7
8
#include <stdio.h>

int main() {
  int x = 0x12345678; /* 305419896 */
  unsigned char *p = (char *)&x;
  printf("%0x %0x %0x %0x\n", p[0], p[1], p[2], p[3]);
  return 0;
}
What is the maximum size of an array in C?
There is no fixed limit to the size of an array in C.
——引用自 What is the maximum size of an array in C? - Stack Overflow
但是 Bash 本身通常限制了一些大小(如下是 CentOS 7.2 上的默认设置):
1
2
3
4
5
6
7
8
9
10
11
12
13
14
15
16
17
# ulimit -a
core file size          (blocks, -c) 0
data seg size           (kbytes, -d) unlimited
scheduling priority             (-e) 0
file size               (blocks, -f) unlimited
pending signals                 (-i) 15075
max locked memory       (kbytes, -l) 64
max memory size         (kbytes, -m) unlimited
open files                      (-n) 1024
pipe size            (512 bytes, -p) 8
POSIX message queues     (bytes, -q) 819200
real-time priority              (-r) 0
stack size              (kbytes, -s) 8192
cpu time               (seconds, -t) unlimited
max user processes              (-u) 15075
virtual memory          (kbytes, -v) unlimited
file locks                      (-x) unlimited
其中比较重要的是如下几个:
- core file size:执行程序出现Segmentation fault错误时输出的 core 文件的大小。如果设置为 0 (0 为默认值),则不会输出 core 文件
- stack size:程序运行过程中可以使用的最大栈内存的大小。如果设置太小(比如默认的 8192 KB),则你执行程序时很容易出现 Segmentation fault 错误,尤其是你在程序中声明了较大数组(静态数组例外)或较深层次的递归的情况下
另外需要注意的是ulimit是 Bash 内置命令,所以不能使用ulimit --help来获取相应的帮助,而应使用help ulimit命令
print in binary format?
The printf() family is only able to print in base 8, 10, and 16 using the standard specifiers directly. I suggest creating a function that converts the number to a string per code’s particular needs.
Quick and easy solution:
1
2
3
4
5
void printbits(my_integer_type x)
{
    for(int i=sizeof(x)<<3; i; i--)
        putchar('0'+((x>>(i-1))&1));
}
Greatest:
1
2
3
4
5
6
7
8
9
10
11
12
13
14
15
16
17
18
19
20
21
22
#define TO_BASE_N (sizeof(unsigned)*CHAR_BIT + 1)

//                               v. compound literal .v
#define TO_BASE(x, b) my_to_base((char [TO_BASE_N]){""}, (x), (b))

// Tailor the details of the conversion function as needed
// This one does not display unneeded leading zeros
// Use return value, not `buf`
char *my_to_base(char *buf, unsigned i, int base) {
  assert(base >= 2 && base <= 36);
  char *s = &buf[TO_BASE_N - 1];
  *s = '\0';
  do {
    s--;
    *s = "0123456789ABCDEFGHIJKLMNOPQRSTUVWXYZ"[i % base];
    i /= base;
  } while (i);

  // Could employ memmove here to move the used buffer to the beginning

  return s;
}
以上内容来自 c - Is there a printf converter to print in binary format? - Stack Overflow
如何从函数返回数组?
版权相关:本部分内容修改自【原】C语言函数返回数组的问题
有些时候需要子函数将一个数组返回出来,通常是两种方法,一种是靠指针,另一种是结构体。
一、使用指针(推荐)
对于 char 数组可以直接使用
char*:1 2 3 4 5 6 7 8 9 10 11 12 13
#include <stdio.h> char *test() { //char tmp[30]="第一个测试例子\n";//写成这样编译时弹出警告,最后的结果也是乱码 char *tmp="第一个测试例子";//写成这样可以用指针返回数组首地址 return tmp; } void main(void) { printf("%s",test()); }
解释:之所以
*tmp可以而tmp[30]不可以,是因为tmp[30]是个局部变量,子函数结束时该数组地址虽然没变,但是里面的值已经无意义了,而*tmp是定义了一个全局变量。对于普通数组,可以使用
static这个关键字(也可使用malloc函数,如果数组大小是个变量而非常量的话):1 2 3 4 5 6 7 8 9 10 11 12
#include <stdio.h> char *test() { static char tmp[30]="第二个测试例子"; return tmp; } void main(void) { printf("%s",test()); }
解释:在数组
tmp[30]前面加入了static关键字,它就使得tmp[30]存放在内存中的静态存储区中,所占用的存储单元一直不释放直到整个程序运行结束.所以当主函数调用完print()函数后,该空间依然存在.所以main()函数中获得首地值后可以访问数组中的元素.
二、使用结构体
1
2
3
4
5
6
7
8
9
10
11
12
13
14
15
16
17
18
19
20
21
22
23
#include <stdio.h>
#include <string.h>

struct ret
{
    char buf[100];
};//定义结构体时不要忘了分号

struct ret test(char *tmp)
{
    struct ret a;
    strcpy(a.buf,tmp);
    return a;
}


int main()
{
    struct ret b;
    b=test("用结构体作为返回值传递数组");
    printf("%s\n",b.buf);
    return 0;
}
数组之间的赋值不能直接赋值,即不要直接将数组A赋给数组B,而是要用strcpy(字符型数组)或者memcpy(非字符型数组);而结构体可以直接赋值
此外,如果上面的代码中的结构体 ret 中的成员变量 buf 的大小较小的话,将会导致意外错误,笔者遇到了两种 Bus error 和 Segmentation fault
static 有什么用?
- 隐藏: 当我们同时编译多个文件时,所有未加static前缀的全局变量和函数都具有全局可见性。加了 static 的成员则只在当前文件内可见
- 持久: 保持变量内容的持久。存储在静态数据区的变量会在程序刚开始运行时就完成初始化,也是唯一的一次初始化。共有两种变量存储在静态存储区:全局变量和static变量,只不过和全局变量比起来,static可以控制变量的可见范围。
- 默认初始化为0: 其实全局变量也具备这一属性,因为全局变量也存储在静态数据区。在静态数据区,内存中所有的字节默认值都是0x00,某些时候这一特点可以减少程序员的工作量。比如初始化一个稀疏矩阵,我们可以一个一个地把所有元素都置0,然后把不是0的几个元素赋值。如果定义成静态的,就省去了一开始置0的操作。
总结:首先static的最主要功能是隐藏,其次因为static变量存放在静态存储区,所以它具备持久性和默认值0。
参考链接: static的作用
free 两次的后果?
第1次free后可能会被其他线程使用(如malloc),所以再次free将导致free掉其他线程正在使用的内存,所以free一次建议将其置为NULL。另外,有的系统会直接报错,提示你free twice
I have been taught in lectures, that calling free() on a pointer twice is really, really bad. I know that it is good practice, to set a pointer to NULL, right after having freed it.
——来自 https://stackoverflow.com/questions/34284846/calling-free-on-a-pointer-twice